
Halloween is just around the corner, and if your kids are already counting down the days, you’re probably looking for fun ways to keep them busy (and to dress up the house at the same time). My favorite answer every single year: DIY pumpkins! Whether you crochet, paint, carve or sew, a handmade pumpkin decorates your porch, mantel or table and makes for a great family activity. Browse my Halloween decor ideas and DIY projects for even more inspiration.
In this roundup I’ve gathered 22 DIY pumpkin ideas for Halloween from talented creators around the web, grouped by technique: crochet pumpkins, painted no-carve pumpkins, glowing pumpkin lanterns and soft fabric pumpkins. For each one you’ll find a quick description and a link to the original tutorial, plus my own practical tips on materials, safety and doing it with kids. Tell me in the comments which one you’ll try first!
Contents
1. Crochet pumpkins you can keep year after year
2. No-carve painted pumpkin ideas kids can help decorate
3. Carved and cut-out pumpkin lanterns that glow after dark
4. How to sew a soft fabric pumpkin from scraps
5. Practical tips for DIY pumpkins: materials, safety and kids
Crochet pumpkins you can keep year after year
Let’s start with something for the yarn lovers. Crochet pumpkins are the ultimate reusable decoration: they never rot, they’re safe around little ones and pets, and you can pull them out of the storage bin year after year. They look just as good on a Halloween table as they do on a bookshelf all fall long.
Most crochet pumpkins follow the same basic idea: you work a rectangle or a tube in ribbing, gather both ends, stuff it, then pull the yarn through the center a few times to create the classic pumpkin segments. A stem in brown yarn (or a real twig or cinnamon stick) finishes the look. Chunky or velvet yarns work up fast and give a plush, modern look.
A few practical pointers if you’re new to amigurumi-style projects: worsted-weight cotton or acrylic yarn and a matching hook (often around 4–5 mm, check your yarn label) are a good place to start. Cotton gives crisp stitch definition, while chunky or velvet yarns make plump, squishy pumpkins that are very on trend. Polyester fiberfill is the easiest stuffing, and a cinnamon stick, a twig or a scrap of brown felt makes a perfect stem.

1. Chunky orange and cream crochet covers dress up little succulent pots © 1 Dog Woof
A clever twist: this crochet pumpkin doubles as a cozy cover for a potted succulent. It’s a sweet way to bring a little green into your Halloween decor, and it can stay out right through Thanksgiving.
See the tutorial on 1 Dog Woof

2. An orange ribbed tea cozy, topped with green leaves, beside a mint teacup © Marie Claire
Fancy a cup of tea? This pumpkin-shaped tea cozy turns an ordinary teapot into a seasonal centerpiece for a fall afternoon tea.
See the tutorial on Marie Claire

3. Plump orange crochet pumpkins crowned with dark green leafy stems © IA Nickelpiga
Small crochet pumpkins like these are perfect for scattering across a table or filling a bowl. Little projects are also a great way to use up leftover yarn.
See the tutorial on IA Nickelpiga

4. Held up close: one rust and one bright orange ribbed pumpkin © Gina Michele
If you’d rather make a statement, go big. A large crochet pumpkin looks great on the floor next to the fireplace or on a bench by the front door.
See the tutorial on Gina Michele

5. Mini orange and yellow crochet pumpkins perched among real squash © Coton et Gourmandises
Mini pumpkins are quick to make, so you can crochet a whole patch in an evening. Tuck them into place settings or hang them on a fall garland.
See the tutorial on Coton et Gourmandises

6. A chunky ivory pumpkin with a braided texture and a yarn stem © Yarn Society
Not everything has to be orange! A white crochet pumpkin with a textured stitch feels elegant and works with neutral, farmhouse-style fall decor.
See the tutorial on Yarn Society
No-carve painted pumpkin ideas kids can help decorate
Next up: painted pumpkins. No-carve pumpkins are my top pick when kids are involved because there are no knives, no slimy insides and much less mess. Little ones can let their creativity run wild, and an uncarved pumpkin also lasts much longer than a carved one, often several weeks in a cool spot.
For best results, wash and thoroughly dry your pumpkin first, then use acrylic craft paint. A coat of primer or white paint helps light colors pop on an orange pumpkin. Once dry, a spray of clear sealer protects your design if the pumpkin will sit outside. Faux craft pumpkins work too, and you can keep them for years.
Choosing the right pumpkin helps too. Look for one with a flat bottom so it sits steadily, smooth skin without soft spots or bruises, and a sturdy, dry stem. Never carry a pumpkin by its stem: it can snap off, and a broken stem lets moisture in and shortens the pumpkin’s life. Faux craft pumpkins are another great option for painting, since you can keep them and bring them out again every year.

7. Black-and-white stripes, grids and dots mixed with pink, yellow and turquoise paint © A Kailo Chic Life
Bright colors and graphic shapes give these pumpkins a fun, retro-inspired look that’s anything but traditional.
See the tutorial on A Kailo Chic Life

8. White pumpkins dipped in pink or blue watercolor, with gilded stems © Twinspiration
This soft ombre effect has a watercolor feel. It’s a pretty option if you prefer pastel, less spooky fall decor.
See the tutorial on Twinspiration

9. Painted eyeballs, little ghosts and skulls cover three orange pumpkins © Handmade Charlotte
Hand-painted patterns turn a plain pumpkin into a little work of art. Paint pens make detailed designs much easier than a brush.
See the tutorial on Handmade Charlotte

10. A pink sugar skull, black polka dots and a cat face against bright red © Hallmark
Simple graphic designs are easy for beginners and look great grouped together on a porch step.

11. A fox face painted on a pumpkin, posed on books on a chippy white chair © Simple as that Blog
Turn your pumpkin into a woodland animal! This painted fox is adorable for kids and stays cute rather than scary. If you love the theme, my woodland kids room ideas might inspire you too.
See the tutorial on Simple as that Blog
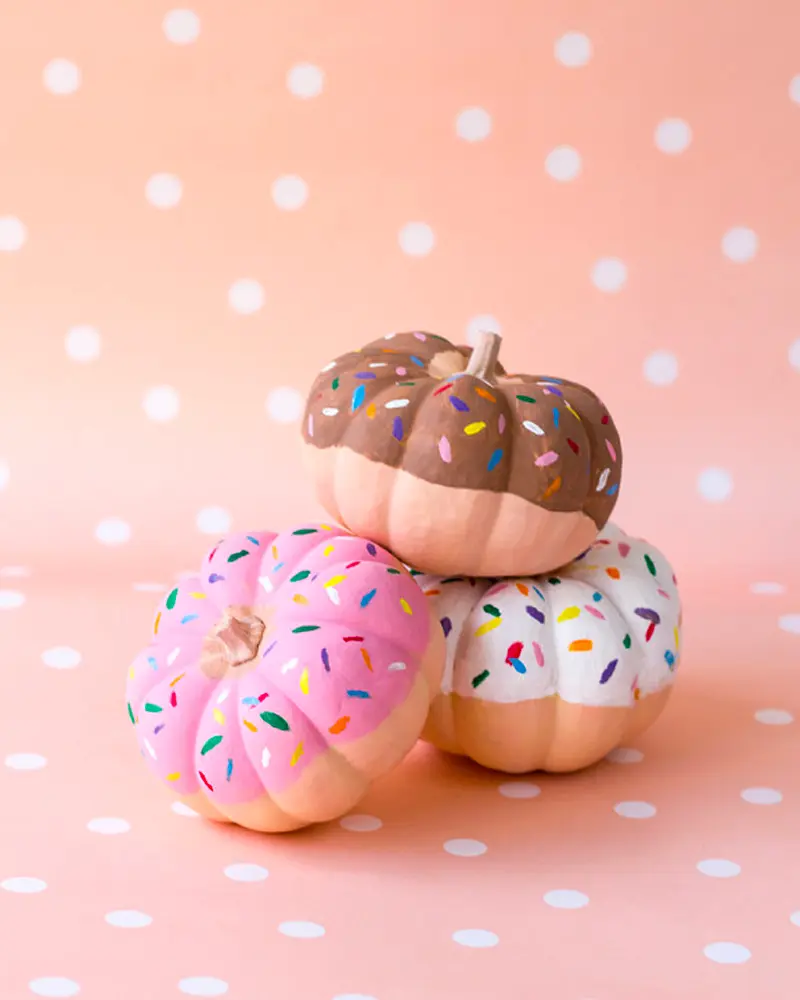
12. Mini pumpkins stacked like donuts with chocolate, pink and vanilla icing © Studio DIY
Who said pumpkins had to look like pumpkins? These playful donut pumpkins, with “frosting” and “sprinkles”, are a guaranteed hit with kids.
See the tutorial on Studio DIY
Carved and cut-out pumpkin lanterns that glow after dark
To finish off the classic projects, here are some glowing pumpkins. These lanterns are perfect for lighting up your front porch or yard on Halloween night and welcoming trick-or-treaters.
Even if you plan to paint or carve, consider the setting: a cluster of three pumpkins in different sizes always looks more intentional than a single one. Mix heights with crates, stools or stacked hay bales, and add a few gourds, dried corn stalks or mums for a full, welcoming porch display.
If you carve a real pumpkin, cut the lid from the back or the bottom at an angle so it doesn’t fall in, scoop out the seeds and pulp with a large spoon, and thin the wall where you’ll carve to about 1 inch (2.5 cm). A printed stencil taped to the surface and traced with a pushpin makes detailed designs much easier. Rubbing petroleum jelly on the cut edges can help slow drying.

13. A cat skeleton glows on a carved pumpkin beside candlelit jars © Vintage Kitty
Cat lovers, this one’s for you: a cat skeleton carving pattern that glows beautifully once lit.
See the tutorial on Vintage Kitty

14. Pumpkins pierced with stars and dots hang glowing by a brick wall © Marie Claire
A group of pumpkin lanterns makes a lovely, warm display along steps or a garden path.
See the tutorial on Marie Claire

15. Matte black jack-o’-lanterns with gilded interiors and grinning faces © South Lumina Style
Black and gold give these glowing pumpkins a chic, grown-up vibe that’s perfect if you’re throwing a Halloween party for adults.
See the tutorial on South Lumina Style

16. Glowing white paper pumpkins with delicate cutout vines © Heart Filled Spaces
A paper pumpkin is light, inexpensive and easy to make with kids. With paper, always use a battery-operated light, never a real flame.
See the tutorial on Heart Filled Spaces

17. Carved pumpkins with wavy flames and simple faces glow on the lawn © Clem Around The Corner
These glowing pumpkins prove that a simple design can be very effective once the lights go out.
See the tutorial on Clem Around The Corner

18. A rabbit and a fox etched into pale pumpkins, glowing by a blue door © Martha Stewart
Another fox, this time carved: stencils are a big help to get a clean, detailed design like this one.
See the tutorial on Martha Stewart
How to sew a soft fabric pumpkin from scraps
Fabric pumpkins are also one of the best projects for using up scraps. Old flannel shirts, a worn sweater, leftover linen or a velvet remnant all make lovely pumpkins, and mixing several textures in a group gives a relaxed, collected look. If you don’t sew, you can even make them with a glue gun: the gathered circle method works with hot glue to close the top, as long as an adult handles the glue gun around kids. Because they never spoil, they’ll come out every fall for years.
A fabric pumpkin is an original way to add a cozy touch to your Halloween and fall decor. The basic method is simple: pick a pretty fabric and cut out a large circle. Sew a running stitch around the edge, pull the thread to gather it into a pouch, stuff it with polyester fiberfill, then close it tightly. Finish with a stem made from a wooden twig or a cinnamon stick. In a few minutes you’ll have a soft, elegant pumpkin that’s perfect for a warm autumn vibe.
For extra definition, run a long needle and strong thread from the center top to the bottom and back around the outside several times to mark the segments. Velvet, linen, flannel and boucle all work beautifully; cotton prints give a more farmhouse feel (see my farmhouse decor guide for more ideas).

19. Red gingham, pink and orange fabric pumpkins lined up on a ledge © Marguerite et Jorge
A trio of fabric pumpkins that would look lovely on a console table or in a dough bowl.
See the tutorial on Marguerite et Jorge
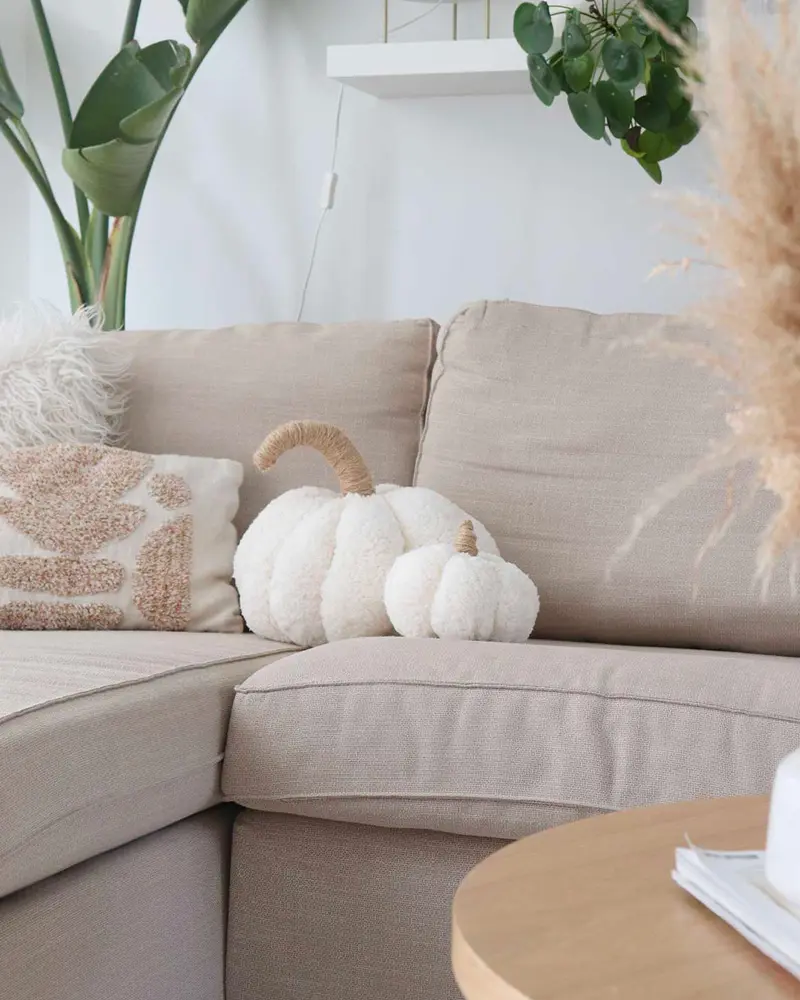
20. Two nubby white boucle pumpkin pillows on a beige sofa © I Do It Myself
This pumpkin pillow in boucle fabric is a cute seasonal accent for the sofa and feels super cozy.
See the tutorial on I Do It Myself

21. A fringed burlap pumpkin with a green leaf and curly tendril © Marie Claire
Another take on the sewn pumpkin, proving that a simple shape and a nice fabric are all you need.
See the tutorial on Marie Claire

22. Orange star-print cotton and a twine stem, with plaid pumpkins behind © Not Quite Susie
Patterned fabrics give these pumpkins a charming farmhouse look, perfect for mixing with real pumpkins and gourds.
See the tutorial on Not Quite Susie
Practical tips for DIY pumpkins: materials, safety and kids
Before you dive into your DIY pumpkins, a little preparation goes a long way. Here’s what to gather, how to keep candles and carving knives safe, which jobs to hand over to kids and how to make your pumpkins last until Halloween.
The basic kit to gather before you start
- Real pumpkins (choose firm ones with no soft spots and a sturdy stem) or faux craft pumpkins
- Acrylic craft paint, paint pens, brushes and a clear sealer spray
- A pumpkin carving kit or a serrated knife, a large spoon or scoop, printed stencils and pushpins
- Yarn and a crochet hook for crochet pumpkins
- Fabric, needle and thread, fiberfill and twigs or cinnamon sticks for fabric pumpkins
- Battery-operated LED tea lights or fairy lights
Keep candles and carving knives safe
I strongly recommend LED candles instead of open flames, especially for paper, fabric or yarn pumpkins, which are flammable; if you do use a real candle, never leave it unattended and keep it away from curtains and walkways. Carving should always be done by an adult or with close supervision, on a stable, dry surface, cutting away from your body.
Give kids the fun, mess-friendly jobs
Give younger kids the fun, safe jobs: scooping out the seeds, drawing the face with a washable marker, painting or adding stickers. Lay down newspaper or a plastic tablecloth and dress them in old clothes. Older kids can try a crochet or sewing project with a bit of help.
How to make your pumpkins last until Halloween
Carved pumpkins usually last only several days to a week, so carve them just a few days before Halloween and keep them out of direct sun and frost; uncarved painted pumpkins often last several weeks. Don’t toss the seeds: rinse, dry, toss with oil and salt and roast until golden. After Halloween, unpainted pumpkins can go in the compost. Looking for more ideas? Don’t miss my DIY Halloween decorations and my Halloween table decorations roundups.
Frequently asked questions
What can I do with a pumpkin instead of carving it?
You can paint it, decorate it with markers, stickers or decoupage, or turn it into a planter or a vase. No-carve pumpkins are safer for kids and last much longer than carved ones.
How do you keep a carved pumpkin from rotting?
Scoop it out thoroughly, keep it in a cool, shady spot and bring it in if a hard freeze is expected. Rubbing petroleum jelly on the cut edges may help slow drying, and carving only a few days before Halloween is the best way to ensure it still looks good on the night.
What paint is best for painting pumpkins?
Acrylic craft paint is the most popular choice: it covers well, dries fast and comes in every color. Paint pens are great for details. Clean and dry the pumpkin first and finish with a clear sealer if it will be outdoors.
Is it safe to put a real candle in a pumpkin?
It can be done with care in a carved real pumpkin, but battery-operated LED candles are the safer choice, especially near kids in costumes, and they’re a must for paper, fabric or yarn pumpkins. Never leave a lit candle unattended.
How do you make a fabric pumpkin without sewing?
Place a ball of fiberfill in the center of a fabric circle, gather the fabric up around it and secure it with a rubber band or hot glue, then tuck in the excess and add a twig or cinnamon stick stem with hot glue. Toilet paper rolls wrapped in fabric are another popular no-sew option.