
Halloween means costumes and candy, but it also means a party table! If you’re hosting a Halloween dinner or a kids’ party this year, the table is where everyone gathers, so it deserves a little spooky magic. To help you out, I’ve rounded up my favorite Halloween table decorations found around the web, all handmade and easy to adapt to your own dishes. You’ll find even more ideas in my Halloween decor section.
Glasses, candle holders, plates, napkins, placemats… below you’ll find 16 ideas to create a Halloween table that will wow your guests, each with a short description and a link to the original tutorial. At the end, I’ve added practical tips on putting the whole table together, choosing materials and keeping things safe with kids around. Most projects take less than an hour, so they fit easily into a busy October. For more handmade inspiration, browse my DIY projects.
Contents
1. Before you start: how to plan your Halloween table
2. How to turn plain glassware into ghosts and monsters
3. Candle holders that cast an eerie glow
4. Ideas to customize your plates with silhouettes and slogans
5. Napkins, placemats and a web-covered tablecloth to finish the look
6. How to pull the whole Halloween table together
Before you start: how to plan your Halloween table
The best tables start with a simple plan: choose two or three main colors (black and orange, black and white, or cream, gray and gold), then a mood, playful for kids or moody for grown-ups. Build in layers, from tablecloth to placemats, plates, glasses, napkins and finally a centerpiece and candlelight; if both kids and adults are coming, a separate kids’ table with its own playful decor works wonders.
How to turn plain glassware into ghosts and monsters
Let’s start with glassware. If you want to give your Halloween table some style, customizing your glasses is an easy way to give them a truly unique look. Here are a few DIY ideas you’re going to love.
Glass paint markers and paint pens are the simplest tools for this. For glasses you’ll actually drink from, keep the decoration away from the rim and check the paint manufacturer’s instructions: some glass paints need to be baked in the oven to become durable, and many are best hand-washed. Removable vinyl stickers or paper tags are a good no-commitment alternative.
A few general tips make the results last longer. Wash and dry the glasses thoroughly first, then wipe the surface with rubbing alcohol so the paint grips. Let the decoration dry for the full time recommended on the marker or paint, and some products also need to be cured in the oven: always follow the manufacturer’s instructions to the letter, putting the glasses in a cold oven and letting them cool down inside it to avoid thermal shock. Even when cured, hand-washing is the safest way to keep your designs intact.

1. Veggie cups drawn as Frankenstein, a ghost and a jack-o’-lantern, filled with celery, cauliflower and carrots © My Mommy Style
Simple marker drawings turn plain clear cups into fun Halloween characters, from Frankenstein to a ghost and a jack-o’-lantern. Filled with celery, cauliflower and carrots, they make a healthy snack kids actually want to eat, and each child can design their own cup.
See the tutorial on My Mommy Style

2. Orange, gray and yellow glasses painted with one-eyed and toothy monster faces © Martha Stewart
Painted glasses with a monster twist add a playful touch to the party drinks.
See the tutorial on Martha Stewart

3. White ghost decals float around a glass of iced coffee © Me and Mr Jones
These ghost glasses are proof that a few simple shapes can be enough to set the Halloween mood.
See the tutorial on Me and Mr Jones

4. Black ghost tags with guests’ names hooked onto clear glasses © We Love Handmade
Glass markers double as place cards: guests know which glass is theirs and where to sit. A smart, cute idea for a party.
See the tutorial on We Love Handmade
Candle holders that cast an eerie glow
Next, here are some pretty DIY candle holders, perfect for adding a warm glow to your Halloween table. They’re all easy to recreate, so you should have no trouble finding the right tutorial for you.
Glass jars and votives are the usual base: paint them, wrap them or add cutouts. My strong recommendation is to use battery-operated LED tea lights inside, especially with paper or gauze wraps and kids around the table. They give a flickering glow without the fire risk.

5. Clear glass hurricanes wrapped in black spider and haunted-house silhouettes © Simple Joy
Clear glass hurricanes become spooky candle holders in a few minutes: just stick on black vinyl decals of spiders and haunted houses. A great last-minute idea.
See the tutorial on Simple Joy

6. Baby food jars painted orange and yellow with jack-o’-lantern faces © Make it Love it
Glass jars painted like pumpkins can hold a candle, treats or nothing at all. They’re versatile and kid-friendly.
See the tutorial on Make it Love it

7. Gauze-wrapped jars with googly eyes stand like a family of mummies © Darcy Miller
Mummy candle holders are a Halloween classic: wrap jars with gauze or strips of fabric and add a pair of eyes. Use LED candles with these.
See the tutorial on Darcy Miller

8. Paper bag ghosts glowing among ivy leaves © Jetzt Kommt Kurth
Paper ghost luminaries create a soft glow on the table. With paper, use battery-operated lights only.
See the tutorial on Jetzt Kommt Kurth
Ideas to customize your plates with silhouettes and slogans
Do you have some plates you’d like to customize for your Halloween table? Then you’ll love these tutorials. Here are a few great DIY Halloween plate ideas.
Adhesive vinyl and paint pens are the most common methods. For plates used with food, keep the decoration on the rim or underside, or use the decorated plates as chargers under a plain plate. Inexpensive white plates from a dollar or thrift store are perfect for these projects.
If you’re using adhesive vinyl, the process is usually the same: clean the plate with rubbing alcohol, cut your design with a cutting machine or by hand, apply it with transfer tape, then smooth out any bubbles with a scraper or a credit card. Vinyl decorations generally peel off without leaving a trace, so you can use the same plates for Thanksgiving or Christmas later. Thrift stores are a great source for inexpensive mismatched plates that make this project even more budget-friendly.

9. Vintage-style engravings of a bat, a claw, a snake and a skull on white plates © Box Wood Avenue
Halloween silhouettes on plates give the table an elegant, slightly vintage feel.
See the tutorial on Box Wood Avenue

10. A single black cat, bat or spider decal at the center of each white plate © Alice and Lois
If you prefer a modern look, these minimalist plates are subtle but festive.
See the tutorial on Alice and Lois

11. A plate wall of black and white designs: webs, skulls, bats and a big 31 © Tatertots and Jello
Inexpensive plates plus vinyl designs: these plates can be used on a table or displayed as a plate wall.
See the tutorial on Tatertots and Jello

12. “The witch is in” in black script on a white plate over a black charger © Shop Craftables
Plates with fun messages add humor to the table and give guests something to talk about.
See the tutorial on Shop Craftables
Napkins, placemats and a web-covered tablecloth to finish the look
Finally, here are four more ideas for a stylish Halloween table. Placemats, napkins and a tablecloth: you’re sure to love these creations!
Textiles are the easiest way to transform a table quickly. A black tablecloth or a burlap runner sets the base for the whole look, and fabric paint, iron-on vinyl or a simple stencil can turn plain cotton napkins and placemats into Halloween linens. If you use fabric paint on table linens, check the label for washing and heat-setting instructions so your designs survive the post-party cleanup.

13. Linen and orange gingham napkins stamped with “Boo!”, a bat and a skull © Boulder Locavore
Customized cocktail napkins are a small detail that makes a big difference, especially for a Halloween cocktail party.
See the tutorial on Boulder Locavore
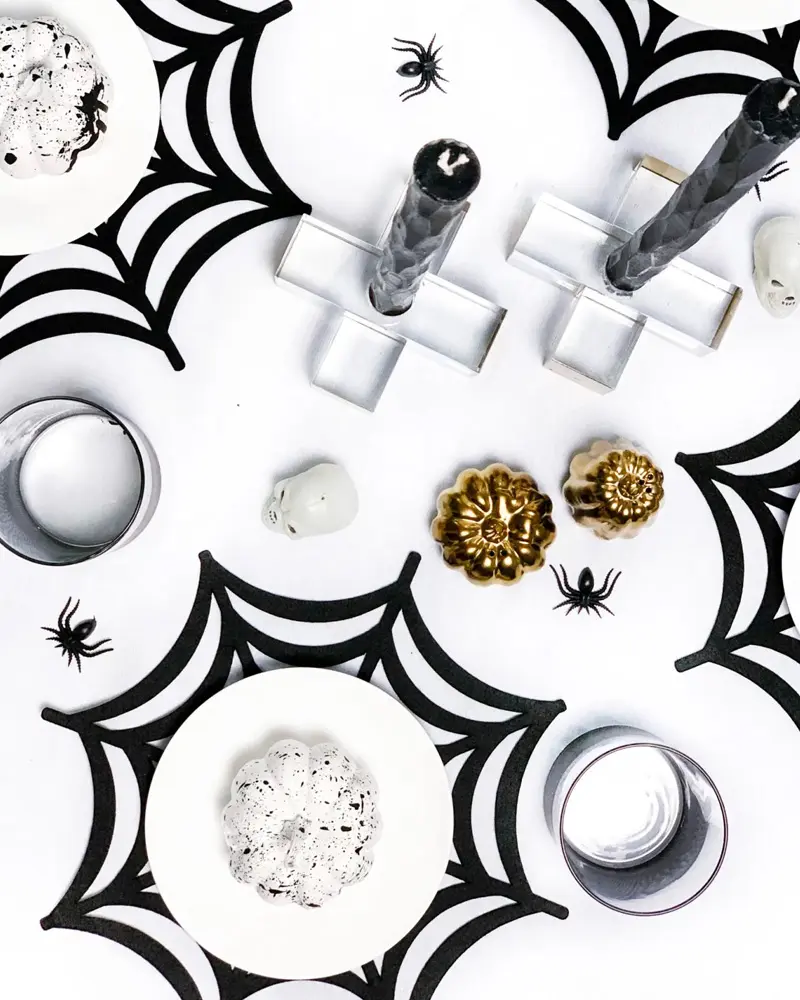
14. Black felt spider web placemats with white plates and gold mini pumpkins © Dwell and Dine
Spider web placemats set the scene at each place setting.
See the tutorial on Dwell and Dine

15. A black tablecloth with bleached spider webs under a “Boo” cake © The House That Lars Built
A spider web tablecloth covers the whole table in one go, perfect if you want an instant Halloween effect.
See the tutorial on The House That Lars Built

16. An orange napkin folded into a little pumpkin, set on a plaid tablecloth © Country Living
Napkin folding is a no-cost way to add a festive touch to each place setting, like this simple pumpkin fold with a stem tucked in the top.
To finish each place setting, add a small personal touch: a name written on a mini pumpkin, a paper bat clipped to the napkin, a sprig of dried eucalyptus or a little bag of treats for each guest. These small details are what people remember, and they double as party favors to take home.
See the tutorial on Country Living
How to pull the whole Halloween table together
Once your DIY pieces are ready, it’s time to bring the table together. Start with a centerpiece, check your supplies, keep little guests safe and plan ahead to store everything for next year.
Build a centerpiece of pumpkins, branches and candles
Every table needs a focal point. Group a few pumpkins (real, painted or fabric), some candle holders and bare branches, pinecones or dried leaves down the center, ideally on a long wooden board you can lift off when food arrives, and keep it low so guests can see each other. For more inspiration, check out my DIY pumpkin ideas.
Your Halloween table supplies checklist
- Glass paint markers or paint pens
- Adhesive vinyl or stencils
- Glass jars, votives and inexpensive white plates
- Cheesecloth or gauze and googly eyes
- Paper, cardstock and twine
- Battery-operated LED tea lights
- Plain napkins, placemats and a white or black tablecloth
Keeping little guests and food safe
Real candles and paper, gauze or fabric decorations don’t mix: stick to LED tea lights, especially at a kids’ party. Keep paint, glitter and vinyl off the parts of plates and glasses that touch food or lips, keep plastic spiders and confetti away from toddlers (choking hazard), and put candy bowls out of pets’ reach.
Store your pieces to reuse next year
Many of these DIYs can be reused: decorated plates, placemats and candle holders can be stored and pulled out again next year. Hand-wash painted pieces gently. And if you need more ideas, see my DIY Halloween decorations and these Halloween printables for place cards and table decor.
Frequently asked questions
How do you decorate a table for Halloween?
Start with a color palette and a base like a tablecloth or runner, then add placemats, plates, glasses and napkins, and finish with a low centerpiece of pumpkins and candle holders. A few DIY touches like painted glasses or spider web placemats make the table feel personal.
How do you make a Halloween centerpiece?
Group pumpkins of different sizes, a few candle holders with LED candles and some dried branches or greenery down the middle of the table. Keep it low so guests can see each other, and repeat the colors of your tablescape.
Can you paint glasses and still drink from them?
Yes, but keep the paint away from the rim and use a paint designed for glass. Follow the manufacturer’s curing instructions, which may include baking, and hand-wash the glasses to make the design last.
What colors are used for a Halloween table?
Black and orange is the classic combination. Black and white looks more modern, while cream, gray and gold create a chic, elegant table. Purple and green add a playful touch for kids.
Are candles safe on a Halloween table?
Battery-operated LED tea lights are the safest option, especially with paper, fabric or gauze decorations and kids nearby. If you use real candles, keep them in glass holders, away from flammable items, and never leave them unattended.