DIY concrete projects completely change the way you approach home decor. This raw material brings an industrial, modern feel that’s a real change from the usual store-bought pieces, and its soft gray, slightly mottled surface looks great next to greenery, wood and warm metals like copper and brass. Making your own concrete decor gives you one-of-a-kind pieces with plenty of personality, and these projects are more doable than you might think: a bag of mix, a few improvised molds and some patience are often all you need. The result is always impressive.
I’ve rounded up 17 DIY projects that explore everything concrete can do. They cover different skill levels and work with every style, from minimalist Scandinavian to full-on industrial. Planters, statement furniture, modern lighting: each piece brings its own personality to a room, and all of them can be done with basic tools. For more ideas built on this material, browse our concrete decor section and the rest of our DIY projects. If you love the look, my industrial decor guide shows how to style it.
Contents
1. Before you start: the right mix, safety gear and curing time
2. How to make concrete planters that show off your plants
3. Concrete furniture ideas where design meets function
4. Why concrete lamps bring an industrial-chic glow
Before you start: the right mix, safety gear and curing time
Use a fine-grained mix (craft concrete, cement-all or sand-topping mix) for small pieces and a countertop mix with reinforcement for furniture, and follow the water ratio on the bag. Wear a dust mask, gloves and glasses, never rinse leftovers down the sink, and let pieces cure slowly, covered loosely with plastic, for a day or two before unmolding.
How to make concrete planters that show off your plants
Concrete planters contrast beautifully with greenery, stand up to the weather and age gracefully. Oil your molds so they release easily, tap out air bubbles after pouring, and set a cork or dowel in the bottom of the mold if you want a drainage hole.
1. A round DIY concrete planter
Level: Easy | Time: 2–3 hours + drying | Budget: $10–20 | Materials: Concrete mix, molds, release oil, sandpaper

1. Two round pots, one with succulents, one with dried blooms, on a pine table © MyMyCraCra
This DIY concrete pot makes a modern, personalized planter. The molding technique makes it doable even for beginners, and the raw concrete finish fits right into industrial or minimalist decor. I find these homemade pots add an authentic touch to any room.
Fresh concrete is alkaline, which some plants dislike. Many makers soak new planters in water for a few days, changing the water a couple of times, before planting directly in them, or simply use them as cachepots around a plastic nursery pot.
See the tutorial on MyMyCraCra
2. Mini gold-dipped concrete planters
Level: Easy | Time: 2–3 hours + drying | Budget: $10–20 | Materials: Concrete mix, molds, gold paint, plants

2. Gold triangles and polka dots painted on little concrete succulent pots © DIY in PDX
These mini concrete pots get an elegant gold finish. You mold the concrete, then add metallic paint for a polished look. The little planters bring a modern, chic touch to any shelf or windowsill. The project is beginner-friendly and an easy way to personalize your decor with a gilded industrial style.
See the tutorial on DIY in PDX
3. A rustic hypertufa planter for the garden
Level: Intermediate | Time: 2–3 hours + 24 hours drying | Budget: $15–30 | Materials: Portland cement, peat moss, perlite, plastic containers, gloves

3. A rough-textured hypertufa trough planted with lavender on the porch © My Sweet Savannah
This project uses hypertufa, a mix of cement and organic materials, to make rustic planters. The finish looks just like weathered natural stone and adds real charm to a garden, patio or porch. It’s a great way to get a country-chic look without paying for real stone troughs. The proportions need to be precise, but with a little patience it’s very doable.
Hypertufa is much lighter than solid concrete, which makes it a great choice for large garden containers you might want to move. It’s porous, so it drains well and suits alpine plants and succulents, and it develops moss and a weathered patina outdoors over time.
See the tutorial on My Sweet Savannah
4. Hanging cone-shaped concrete planters
Level: Intermediate | Time: 2–3 hours + 24 hours drying | Budget: $15–25 | Materials: Concrete mix, cardstock or plastic cone molds, release oil, gold leaf or paint, cord

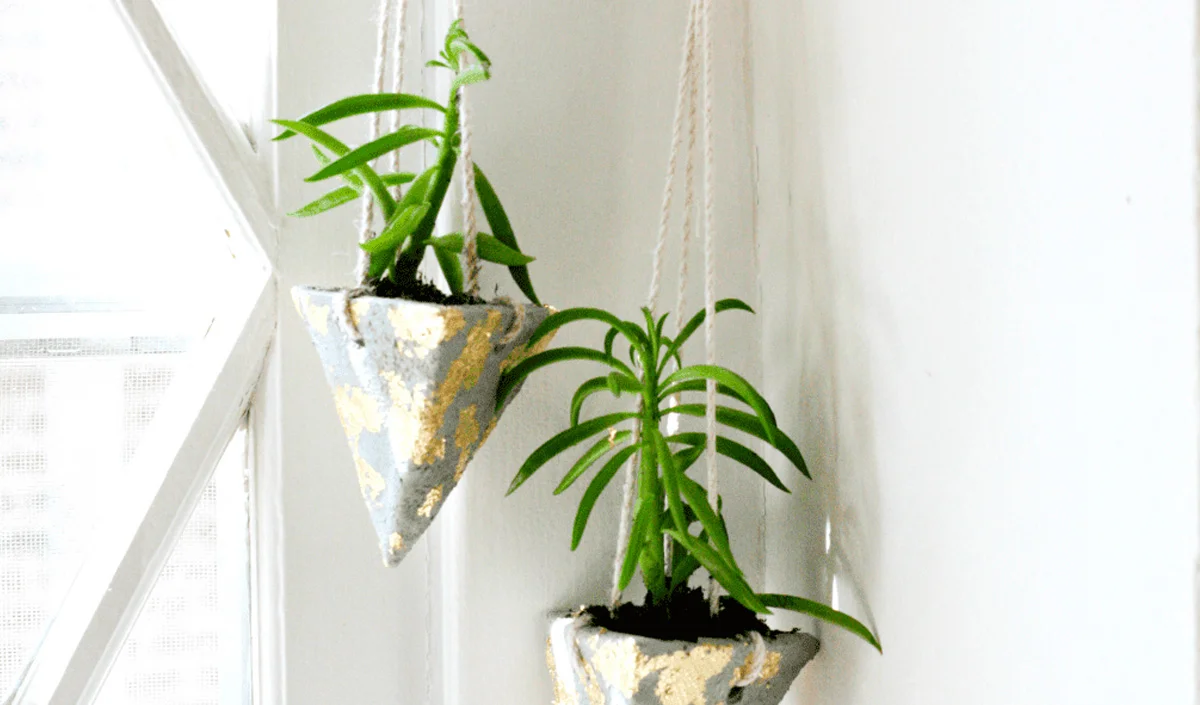
4. Cone-shaped pots streaked with gold, hanging on cords by a window © Pretty Life Girls
These hanging concrete planters add a modern industrial touch indoors or out, and the pointed, faceted shapes with touches of gold look striking against a bright window. I think this project works especially well in minimalist and contemporary spaces. It’s rated intermediate because handling concrete takes some precision with the mix and the timing.
When you hang concrete planters, keep in mind that even small ones can be heavier than they look once they’re filled with wet soil. Use a sturdy ceiling hook screwed into a joist or a solid beam, and a rope or chain rated for the weight.
See the tutorial on Pretty Life Girls
5. A concrete planter made with a plastic bottle
Level: Easy | Time: 2–3 hours + drying | Budget: $5–10 | Materials: Concrete mix, plastic bottles, oil, sandpaper

5. A cactus in a pot that still shows the ridges of its plastic-bottle mold © Cupcakes and Cutlery
This project turns a plain plastic bottle into a mold for an original concrete planter. You pour the concrete between two bottles of different sizes to get the hollow shape. The finish is modern and industrial, perfect for contemporary or Scandinavian decor. It’s a great way to recycle while making a unique piece for your plants.
See the tutorial on Cupcakes and Cutlery
6. A tall concrete planter to update your decor
Level: Intermediate | Time: 2–3 hours + 24 hours drying | Budget: $15–30 | Materials: Concrete mix, two containers (molds), release oil, sand

6. A tall square planter in a terracotta tint holds an agave outdoors © Remodelaholic
This project makes a large concrete planter with a trendy terracotta-style effect. You mold the concrete between two containers of different sizes to create the hollow shape. The finished piece adds an industrial, modern touch that suits contemporary homes. I find it approachable, even if unmolding takes a bit of patience.
See the tutorial on Remodelaholic
Concrete furniture ideas where design meets function
Coffee tables, desks, nightstands: concrete furniture has real presence and pairs beautifully with wood, metal and textiles. It’s heavy, so plan where it will live, reinforce tabletops, and seal the surface so it won’t stain; if pouring feels like too much, the faux-concrete finishes below give the look at a fraction of the weight.
7. A modern DIY concrete desk
Level: Advanced | Time: 2–3 days | Budget: $165–220 | Materials: Concrete mix, form boards, reinforcement, metal legs, sandpaper

7. A smooth gray desktop on white trestle legs with a black lamp © The Merrythought
This concrete desk brings a very current industrial look to a workspace. You build a precise form, then pour the concrete to make the top. The result fits right into a modern or loft-style room. I’d recommend this one to experienced DIYers, since working with concrete takes precision and patience. Need more workspace inspiration? See my small home office ideas.
See the tutorial on The Merrythought
8. A faux concrete cube side table
Level: Intermediate | Time: 1 weekend | Budget: $15–30 | Materials: Concrete-effect coating, wooden cube, brush, sandpaper

8. An open cube in faux concrete serves as a side table next to the sofa © Nora Conte Tout
This project turns a simple wooden cube into a side table with a gorgeous concrete effect. You apply a special coating that perfectly mimics the raw look of concrete. It adds a modern industrial touch to any room, and it’s a great way to get on-trend furniture without breaking the bank.
See the tutorial on Nora Conte Tout
9. A round DIY concrete pedestal table
Level: Intermediate | Time: 2–3 hours + 24 hours drying | Budget: $35–55 | Materials: Concrete mix, mold, release oil, sander
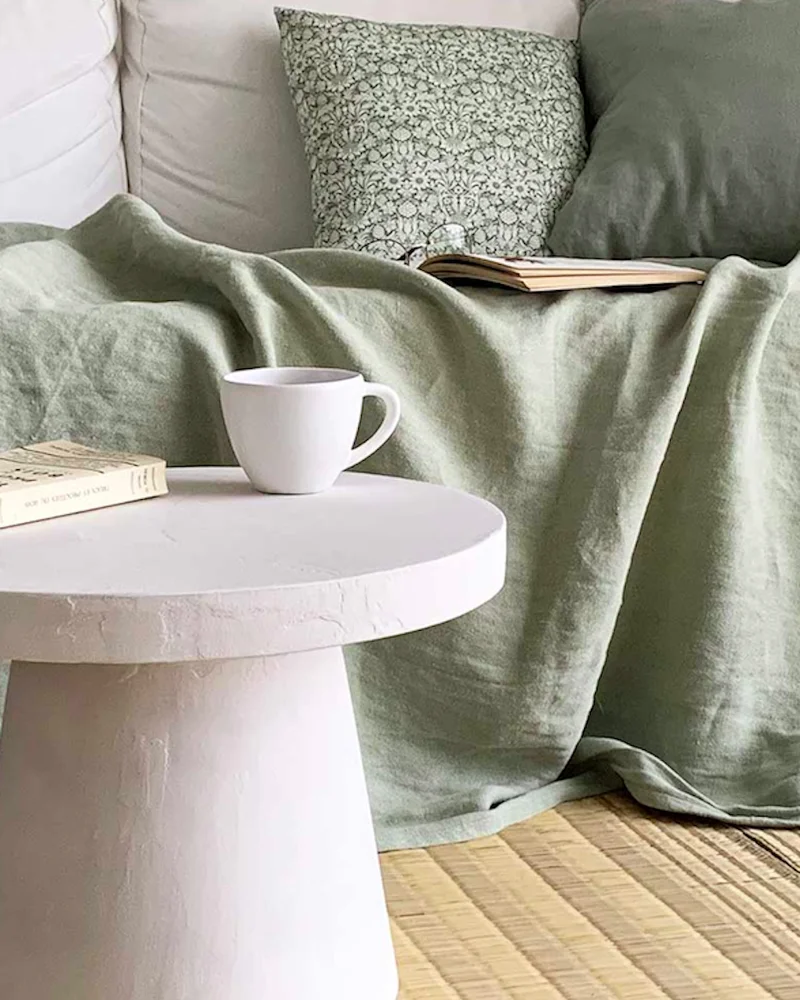
9. A round pedestal table in pale concrete next to a sage linen throw © Milk Decoration
This concrete coffee table adds an industrial, contemporary touch to a living room. Molding it takes a little patience but is very manageable with good guidance. The raw finish is really satisfying and suits modern spaces perfectly. It’s an ideal project for creating a unique piece on a budget.
See the tutorial on Milk Decoration
10. A DIY concrete bathroom vanity
Level: Advanced | Time: 2–3 days | Budget: $165–220 | Materials: Concrete mix, wood form, drop-in sink, woodworking tools
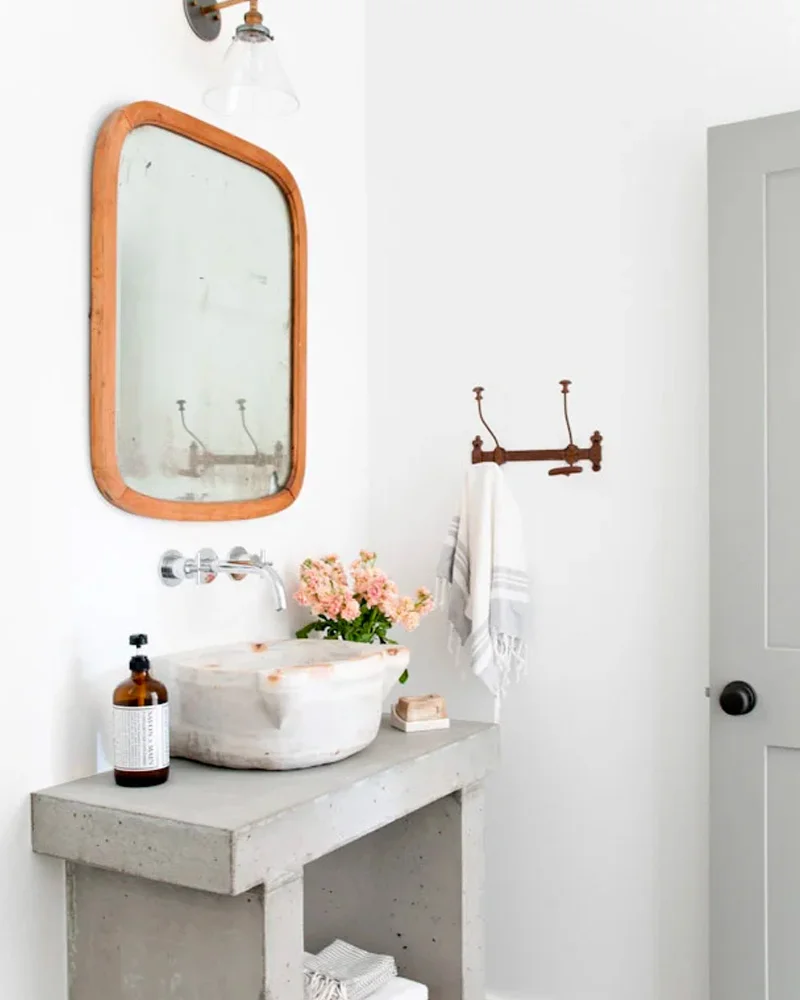
10. A slab-style concrete vanity with a stone basin and a wood mirror © Heather Bullard
This project lets you build a fully custom modern vanity. Cast concrete takes precision to get smooth, durable surfaces, and the finished piece brings an industrial-chic style to a contemporary bathroom. I recommend it for experienced DIYers, since you need a good handle on mix ratios and curing time.
For anything that holds water, like a sink or a vanity top, a proper sealer is essential. Choose one that’s rated for kitchens and bathrooms and reapply it as recommended by the manufacturer to keep water and soap from soaking in.
See the tutorial on Heather Bullard
11. A faux concrete TV stand IKEA hack
Level: Intermediate | Time: 1 weekend | Budget: $55–90 | Materials: IKEA unit, concrete-effect coating, brushes, sandpaper

11. A low white media unit with rounded cubbies under an olive tree © Megan Vlt
This project turns a basic IKEA piece into an industrial-style TV stand with a concrete effect. You apply a specialty coating to get that authentic texture. The result adds a modern, on-trend touch to a living room, and it’s a perfect way to get a unique piece without blowing the budget.
Concrete-effect coatings usually go on in several thin layers, sanded lightly in between. Applying them with a trowel or spatula and varying the pressure is what creates the subtle, cloudy variations that make the finish look like real poured concrete.
12. A floating DIY concrete nightstand
Level: Intermediate | Time: 1 weekend | Budget: $25–40 | Materials: Cement, sand, cardboard boxes, form release oil, sander

12. A floating concrete box serves as a nightstand under a bare bulb © Maison Créative
This project turns concrete into on-trend bedroom furniture. The clean-lined nightstand brings a modern industrial touch, and using cardboard boxes as the form makes it accessible, even if molding takes a little patience. The raw, authentic finish fits perfectly in a contemporary or loft-style bedroom.
See the tutorial on Maison Créative
Why concrete lamps bring an industrial-chic glow
Concrete lamps play with light and shadow, and a heavy base keeps a tall lamp stable. Unless you’re comfortable with electrical work, use a ready-made, UL-listed lamp kit, keep the cord replaceable and protected from sharp edges, and choose cool-running LED bulbs.
13. An IKEA hack concrete table lamp
Level: Intermediate | Time: 4–6 hours + drying | Budget: $15–30 | Materials: IKEA lamp, quick-setting concrete, mold, lamp wiring kit

13. A white globe shade sits on a cast concrete base atop a stack of books © Paper and Stitch
This project turns a simple IKEA lamp into a modern light fixture using concrete. You cast a custom concrete base to replace the original one. The result adds an industrial, contemporary touch that fits minimalist spaces perfectly. A clever way to get a designer lamp for less.
See the tutorial on Paper and Stitch
14. A modern wood and concrete lamp
Level: Intermediate | Time: 4–6 hours | Budget: $35–45 | Materials: Concrete mix, wood board, LED bulb, electrical cord, mold

14. A wooden arm and metal shade rise from a rectangular concrete base © ManMade DIY
This project elegantly combines raw concrete and natural wood in an industrial-modern desk lamp. The concrete base adds stability and character, while the wood warms up the look. It fits beautifully into contemporary or Scandinavian decor. Working with concrete takes a little patience, but it’s very doable with the right technique.
See the tutorial on ManMade DIY
15. A faux cement lamp made with modeling clay
Level: Easy | Time: 2–3 hours | Budget: $15–30 | Materials: Modeling clay, lamp wiring kit, concrete-effect paint

15. A rounded base with a mottled cement look under a white drum shade © Designed Simple
This project gives you a lamp with a beautiful concrete look without using any real cement. You shape the base with clay, then apply a textured paint that mimics raw concrete. It suits industrial or modern decor, and I love how clever it is: you skip the hassle of real concrete and still get the look.
Faux concrete techniques like this one are a good option for kids’ rooms, renters or anyone who wants to avoid working with cement. Air-dry clay, plaster and textured paints can all mimic the gray, slightly mottled look of concrete surprisingly well.
See the tutorial on Designed Simple
16. A trendy concrete and copper lamp
Level: Intermediate | Time: 3–4 hours + drying | Budget: $25–40 | Materials: Quick-setting concrete, copper pipe, LED bulb, electrical cord, mold

16. An angled copper pipe holds a globe bulb over a concrete foot © Look What I Made
This project combines two favorite modern materials: raw concrete and warm copper. You pour concrete into a mold, building in the wiring with a copper pipe as the stem. The finished lamp has an industrial-chic look that’s perfect for a contemporary living room or a loft-style bedroom. It’s quite doable with a few precautions when casting.
See the tutorial on Look What I Made
17. A minimalist DIY concrete lamp
Level: Intermediate | Time: 3–4 hours + 24 hours drying | Budget: $15–30 | Materials: Craft concrete, mold, lamp wiring kit, sandpaper

17. A simple concrete cylinder topped with a silver-crowned bulb © Perles & Co
This project makes a clean-lined lamp with craft concrete. You cast the concrete in a mold to get a modern geometric shape, and the result brings an industrial, contemporary touch to any room. It’s a great way to personalize your decor with a unique piece. Still beginner-friendly, even if concrete takes a little patience. For more handmade ideas, try these DIY living room decor projects or a DIY terrazzo project.
See the tutorial on Perles & Co
If you’re new to concrete, start with one of the small planters: they use very little material, cost only a few dollars, and teach you how the mix behaves, how long to wait before unmolding and how to sand and seal the surface. Once you’ve mastered those basics, a side table or a lamp will feel much less intimidating.
And don’t worry if your first piece isn’t perfect. Small bubbles, slight color variations and imperfect edges are part of the charm of handmade concrete and give each object its own character. You can always sand rough spots smooth, fill holes with a little extra cement paste, or tint your next batch with a pigment made for concrete for a completely different look.
Frequently asked questions
What kind of concrete is best for small DIY projects?
For beginners, a fine-grain craft concrete or a sand-topping mix is easiest: it mixes smoothly, sets fairly quickly and gives smooth surfaces without pro equipment. Avoid standard gravel concrete for small pieces, since the coarse aggregate leaves holes and is harder to work into molds.
How do you keep DIY concrete from cracking?
Follow the manufacturer’s water-to-mix ratio closely: too much water weakens the piece and encourages cracks as it dries. Let it cure slowly, out of direct sun, and unmold gently without forcing it. Adding reinforcing fibers to the mix also makes pieces noticeably stronger.
Can you color concrete for DIY projects?
Yes. Concrete pigments mixed into the dry powder before adding water give an even, long-lasting color throughout the piece. Pastels and marbled effects work especially well, and you can also paint or gild the surface after curing.
What tools do you need to work with concrete?
The basics are a mixing bucket, a trowel or spatula, gloves and a dust mask. Molds can be recycled containers or silicone forms, a drill with a paddle mixer helps with larger batches, and sandpaper is used to refine the finish once it’s dry.
How long does DIY concrete take to dry?
Most small pieces can be unmolded after 24–48 hours, depending on thickness. Concrete keeps curing for weeks and reaches most of its strength after about a week, and temperature and humidity affect the timing. Wait at least 5 days before handling delicate pieces heavily.