
Building your own bookshelf lets you make a piece that fits your space and your needs perfectly, whether that’s a narrow gap beside a window, an awkward corner or a whole wall of a kid’s room. A DIY bookshelf gives you a custom touch you just can’t find in stores, and with the right materials and a little creativity, making a one-of-a-kind shelf is well within reach, often for less than a store-bought unit. The finished piece can completely change the feel of a room, and it shows off your books the way you want.
I’ve rounded up 14 DIY bookshelf ideas that use different techniques and materials, for every skill level. They range from industrial to Scandinavian, with a few more unexpected, offbeat designs along the way. Every project relies on easy-to-find materials and simple assembly, and they work just as well in small spaces as in big rooms. For more handmade ideas, browse our DIY projects and our living room decor section, and my DIY living room decor ideas are a great next step.
Contents
1. Plan for weight and safety before you build
2. Why wood crates make sturdy bookshelves
3. How to get rustic charm from fruit crate bookshelves
4. Making the most of simple wood strips for custom shelving
5. Unexpected ideas for creative bookshelves
Plan for weight and safety before you build
Books are heavy: a loaded 3-foot (90 cm) shelf of hardcovers can weigh 30–50 pounds (14–23 kg), so keep spans short, use 3/4-inch (19 mm) plywood or solid wood for longer shelves, and anchor every tall bookcase to a stud with an anti-tip kit, especially in homes with kids.
Why wood crates make sturdy bookshelves
Wood crates are a budget-friendly, modular base that’s easy to rearrange, and the look suits industrial and modern interiors. Check secondhand crates for loose slats, nails and splinters, and sand them well before bringing them indoors.
1. A wall-mounted wood crate bookshelf
Level: Easy | Time: 2–3 hours | Budget: $35–55 | Materials: Wood crates, screws, wall anchors, drill, level

1. Crates fixed to a floral-papered wall form a desk-side bookshelf © Marie Claire
This project turns wood crates into clever wall-mounted storage for a modern bookshelf. The idea is to screw the crates straight to the wall in a staggered arrangement, so they hold books, files and little objects above a desk. It adds character to any room while making the most of vertical space. I think it’s a perfect alternative to classic shelves, especially in eclectic or Scandinavian interiors.
Wall-mounted crates are a great option for small rooms because they keep the floor clear. Screw them into studs or use anchors rated for the load, and keep the heaviest books in the lowest crates.
See the tutorial on Marie Claire
2. A vintage wine crate bookshelf
Level: Intermediate | Time: 3–4 hours | Budget: $35–55 | Materials: Vintage wood crates, sander, paint or wood stain, mounting brackets, screws

2. Dark-stained wine crates stacked under the stairs, with books and jars © The Worst Dinner Guest
This project turns old wine crates into an original wall bookshelf, and I love the authentic vintage charm it brings to any room. You sand the crates to reveal the bare wood, then put them together in whatever configuration you like. It works beautifully in industrial, Scandinavian or rustic interiors. It’s still beginner-friendly, although mounting it to the wall takes a little precision.
Sanding reveals the warm bare wood underneath any stamps or grime, but it’s worth keeping a few of the printed logos if you like the vintage look. Finish with a clear matte varnish or a furniture wax to protect the wood and make the crates easier to dust.
See the tutorial on The Worst Dinner Guest
3. A modular wood crate bookshelf
Level: Easy | Time: 3–4 hours | Budget: $45–65 | Materials: Wood crates, screws, drill, sandpaper, wood stain or paint
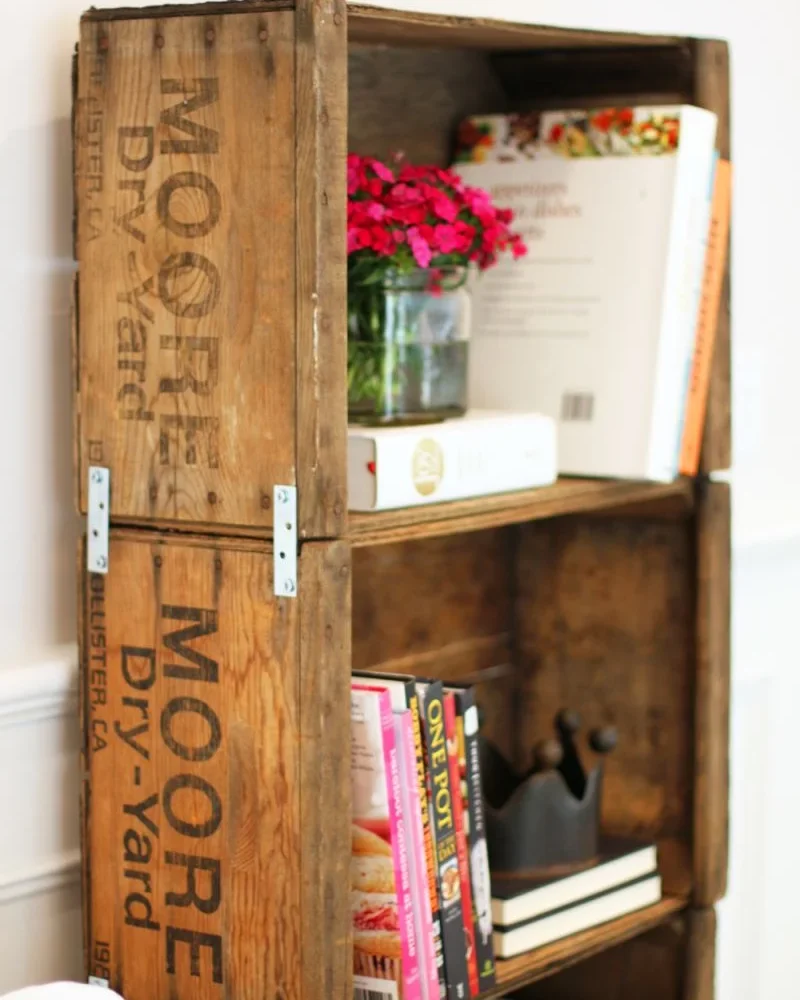
3. Vintage stamped lettering on old crates joined into a tall bookcase © Jessie Daye
This project turns plain wood crates into a modern, functional wall bookshelf. I find the modular approach especially smart because you can adapt the layout to your needs and the space you have. It brings a warm industrial touch that fits right into a Scandinavian or contemporary home. It’s doable even for beginners, with basic techniques that still give a polished result.
When you stack or join crates, screw them together through the sides so they can’t slide apart, and attach the top of the arrangement to the wall. Wood clamps hold the crates in alignment while you drill pilot holes, which keeps the wood from splitting.
See the tutorial on Jessie Daye
4. A set of 15 crate shelves
Level: Easy | Time: 2–3 hours | Budget: About $125 for 15 crates | Materials: Wood crates, screws, drill, sander

4. Crates crammed with rainbow-colored books against a blue wall © Design Mom
This project turns simple wood crates into a modular, on-trend bookshelf. You join the crates in different configurations to create a piece made for your space. The result has a warm industrial feel that’s perfect for a Scandinavian or modern style. I find it very approachable for beginners, and the value for money is excellent.
See the tutorial on Design Mom
How to get rustic charm from fruit crate bookshelves
Slatted fruit crates bring rustic charm and a second life to salvaged wood, a natural fit for boho decor. They’re lighter than storage crates, so use them for paperbacks, plants and objects, or reinforce the bottom with thin plywood.
5. A stylish fruit crate bookcase
Level: Easy | Time: 2–3 hours | Budget: $35–55 | Materials: Wooden fruit crates, screws, drill, sandpaper, paint or wood stain

5. Light wood crates stacked into a compact bookcase by the window © Burkatron
This bookcase turns plain wooden crates into an original, functional storage piece. You can arrange the crates to fit your space and create a custom composition. Depending on the finish you choose, it fits a Scandinavian or industrial style. It’s an easy build, even if you’re new to DIY.
6. A gray painted crate bookshelf
Level: Easy | Time: 2–3 hours | Budget: $35–55 | Materials: Wooden crates, gray paint, screws, bracket
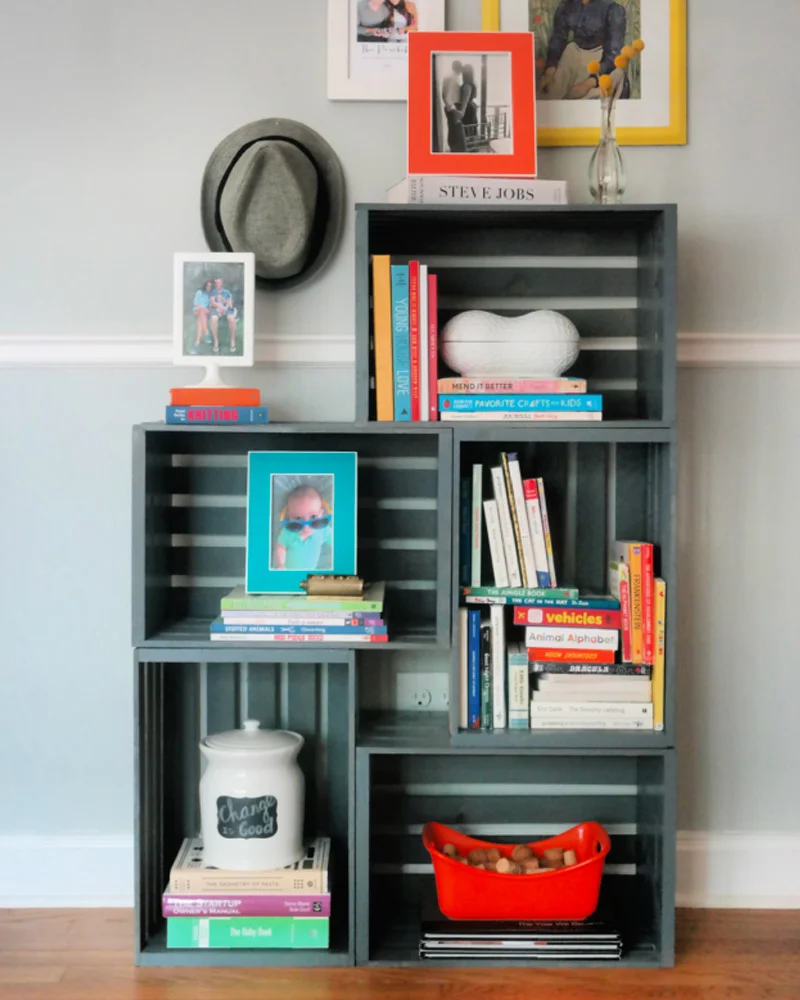
6. Crates painted a deep gray-green, staggered to hold books and frames © Creating Really Awesome Fun Things
This project turns simple wooden crates into a modern, functional bookshelf. The gray paint gives it a contemporary finish that works in any home. Assembly is beginner-friendly, with a simple wall-mounting system. It’s an industrial-style storage solution for books and decorative objects that’s both practical and good-looking, on a budget you control.
For a smooth painted finish, sand lightly, wipe off the dust and use a primer before your color. Spray paint covers slatted crates quickly, while a small foam roller and brush give you more control. Let each coat dry fully before stacking the crates.
See the tutorial on Creating Really Awesome Fun Things
7. A colorful crate wall bookshelf
Level: Easy | Time: 2–3 hours | Budget: $35–55 | Materials: Wooden crates, paint, brushes, screws, wall anchors
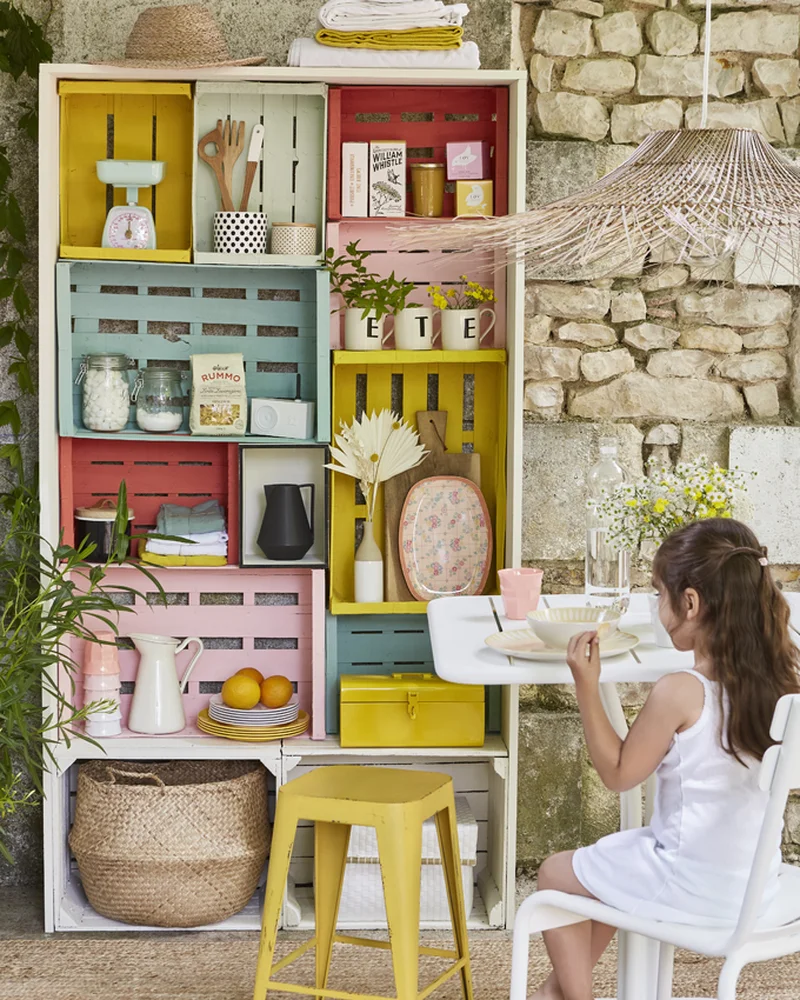
7. Yellow, pink and mint crates form a cheerful wall unit beside a kids’ table © Marie Claire
This project turns plain wooden crates into a wall bookshelf full of character. You can play with color to create a harmonious or contrasting set, depending on your taste. Assembly is simple: screw the crates together, then mount them to the wall. It adds a modern, personal touch to any room, and the result is practical storage that doubles as a real decor statement.
See the tutorial on Marie Claire
Making the most of simple wood strips for custom shelving
Wood strips (furring strips or square dowels) take a little more skill but give you control over every dimension. Bring a cut list to the store, use a miter box for angles and pre-drill every screw hole so thin strips don’t split.
8. A geometric wood strip bookshelf
Level: Intermediate | Time: 4–6 hours | Budget: $45–65 | Materials: Wood strips, corner brackets, screws, level, drill
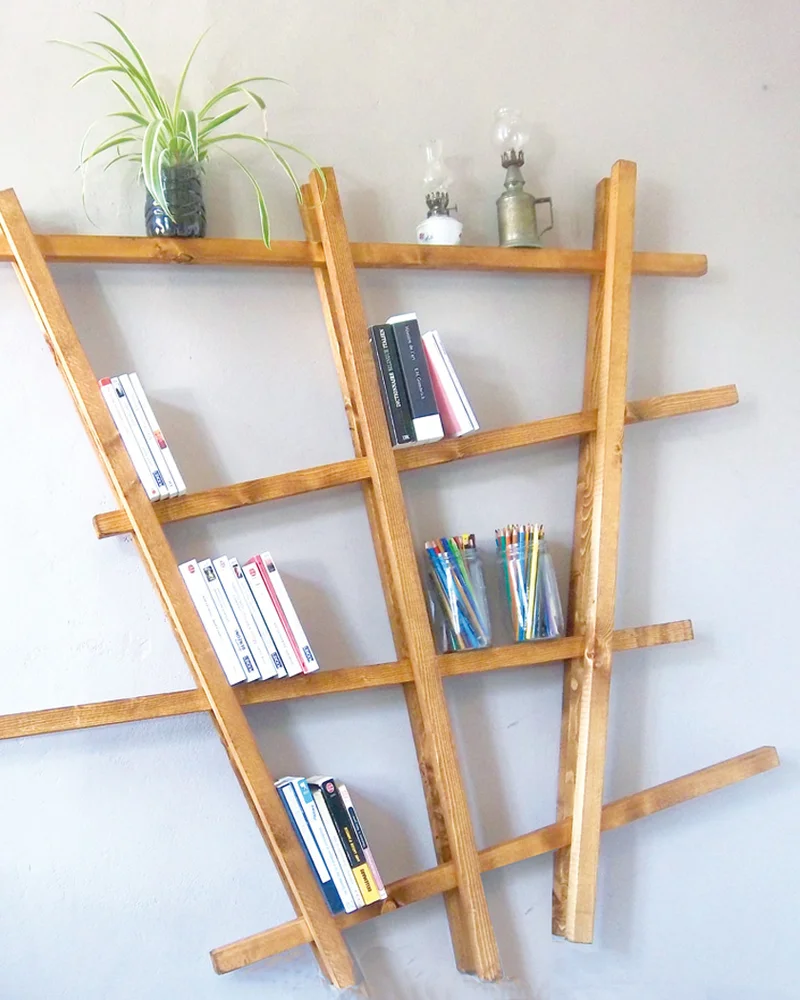
8. Angled wood uprights and crossbars create a leaning wall shelf © Visite Déco
This wood strip bookshelf has a clean, modern look that fits right into a contemporary home. You join the strips with brackets to create an original geometric frame. I find it ideal for making the most of a wall while adding a designer touch to a living room or bedroom. It’s still approachable, as long as you’re careful with measuring and assembly.
See the tutorial on Visite Déco
9. A pick-up sticks bookshelf
Level: Intermediate | Time: 4–5 hours | Budget: $65–90 | Materials: Wood strips, corner brackets, screws, drill, level

9. Pine strips crisscross like pick-up sticks to hold rows of books © Mocassins Serrés Tête
Inspired by the game of pick-up sticks, this bookshelf creates a striking geometric effect from plain wood strips. The asymmetric frame feels artistic while still holding books and decorative objects. I love how it turns a utilitarian piece into real wall art. Lining up the strips takes some precision, but the finished look is worth the effort.
Because the cubbies are irregular, this style works best for a curated mix of books, plants and objects rather than rows of identical volumes. Make sure the crossing points are screwed securely to the wall, as they carry most of the load.
See the tutorial on Mocassins Serrés Tête
10. A triangular wood strip shelf
Level: Easy | Time: 2–3 hours | Budget: $35–55 | Materials: Wood strips, screws, square, drill
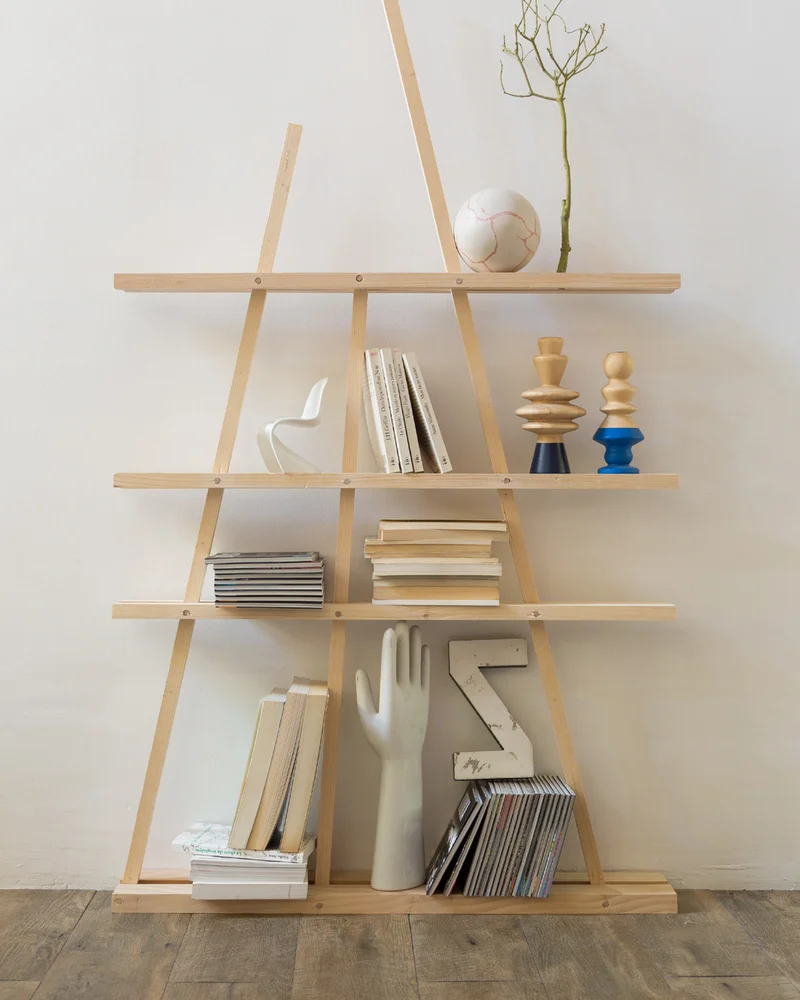
10. An A-frame of slim wood strips holds books, a branch and small objects © DIY Family
This triangular wood strip shelf is a modern way to show off books and decorative objects. It goes together with basic tools and a few simple cuts, and its clean A-frame lines suit contemporary or Scandinavian decor. You can adjust the dimensions to your space.
Cut the angled ends precisely so the frame sits flat, and a coat of water-based polyurethane will protect the wood from scuffs.
See the tutorial on DIY Family
Unexpected ideas for creative bookshelves
Pipes, plywood offcuts and basic furniture pieces can all become a bookshelf no one else has. These projects are perfect if you like to think outside the box.
11. A modern copper pipe and wood bookshelf
Level: Intermediate | Time: 4–5 hours | Budget: $55–90 | Materials: Wood boards, copper pipes, pipe fittings, screws, drill

11. Gleaming copper pipes support wood shelves of plants and decor © Treasures and Travels Blog
This project pairs natural wood with copper pipe for a bookshelf with clean lines. The geometric frame adds a modern industrial touch that fits right into a contemporary home. You’ll need a few DIY skills, especially to assemble the copper fittings, but you end up with a unique, personal piece that shows off your books and decor.
Copper pipe and fittings are sold in the plumbing aisle, and a pipe cutter gives you clean, straight cuts. Copper will develop a natural patina over time; if you prefer to keep it shiny, clean it and seal it with a clear lacquer.
See the tutorial on Treasures and Travels Blog
12. IKEA hack ledge shelves for kids’ books
Level: Easy | Time: 2–3 hours | Budget: $35–55 | Materials: IKEA spice racks or similar wood ledges, screws, wall anchors, level
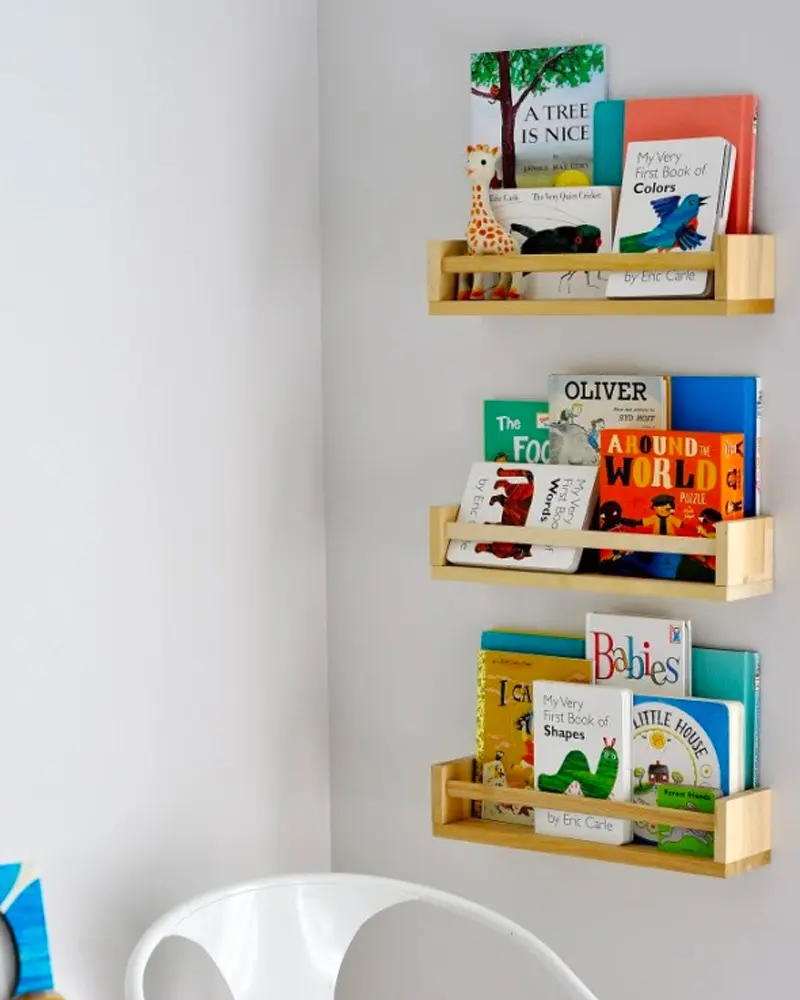
12. Narrow wood ledges display picture books face-out at kid height © Bidouilles Ikea
This project turns simple IKEA wood ledges into a bookshelf designed just for kids. Mounted one above the other, they display picture books face-out. It brings a playful, organized touch to a kid’s room. I think this hack is perfect for a first DIY project, and you end up with storage that’s both useful and cute.
For kids’ rooms, choose low-VOC paints, round off sharp corners and keep the bookshelf low enough that children can reach their books safely on their own. Displaying books face-out also encourages little ones to pick them up.
See the tutorial on Bidouilles Ikea
13. A minimalist corner bookcase
Level: Intermediate | Time: 1 weekend | Budget: $90–130 | Materials: Wood boards, corner brackets, screws, white paint, level

13. A slim plywood tower with white shelves fills the gap beside a window © Free and Unfettered
This minimalist corner bookcase makes great use of an otherwise empty corner. Its straight lines and white finish blend naturally into modern or Scandinavian decor. You’ll need some woodworking skills, especially for precise cuts and the corner joinery. I love that it turns wasted space into elegant storage that’s as practical as it is decorative.
Corner bookcases are one of the most efficient ways to add storage, since corners are often wasted space. Measure carefully, as walls are rarely perfectly square, and adjust your cuts so the shelves sit flush.
See the tutorial on Free and Unfettered
14. A pine bookshelf with X braces
Level: Intermediate | Time: 4–6 hours | Budget: $90–130 | Materials: Wood boards, metal brackets, screws, drill, level

14. Pine shelves with X-shaped braces hold baskets and plants © The Merrythought
This pine bookshelf has a clean design with an open frame braced by crossed X supports. Its shelves hold baskets, plants and decor as easily as books, and its minimalist look suits modern and Scandinavian interiors. It’s rated intermediate because the assembly and measurements need to be precise.
See the tutorial on The Merrythought
If you’re new to DIY, start with a crate project: it’s forgiving, inexpensive and gives you a usable bookshelf in an afternoon. Once you’re comfortable with measuring, cutting and anchoring, move on to wood strips or a custom build. And whatever you make, fill it with the books and objects you love most, because that’s what will truly make it yours.
Frequently asked questions
What is the best wood for a DIY bookshelf?
Pine and plywood are the most affordable and easiest to work with for beginners. For a higher-end look, oak or another hardwood gives a beautiful natural finish and resists sagging better. Avoid very soft or thin boards over long spans, since books are heavy, and make sure the lumber is dry so it doesn’t warp.
How do you anchor a DIY bookshelf to the wall safely?
Use sturdy metal brackets screwed into wall studs whenever possible. On drywall without a stud, use heavy-duty anchors such as toggle bolts or molly bolts. Any tall bookshelf should always be anchored to the wall to prevent tip-overs, especially in homes with kids.
Is it cheaper to build or buy a bookshelf?
Building is usually cheaper for a custom or solid-wood piece: most projects here run roughly $35–150 depending on materials and size. Salvaged crates are the most budget-friendly option, while larger wood builds cost more. Set aside a little extra for screws, brackets and finishes.
What tools do I need to build a bookshelf?
A drill/driver, a saw (hand saw or circular saw) and a tape measure cover most projects. Add a level, a speed square and sandpaper for finishing. For wood strip projects, a miter saw makes clean, accurate cuts much easier, and many home improvement stores rent tools or will cut lumber for you.
How do I finish and protect a wooden bookshelf?
Lightly sand every surface to remove splinters and even out the grain. Apply a primer before painting, or skip it and use a clear finish such as oil or polyurethane for a natural look. Let each coat dry fully, following the product label, before adding the next.