
I’ve been inspired by the trend of bringing faux botanicals into modern interiors. DIY flowers give you all the charm of greenery and blooms without the upkeep of real plants: no watering, no wilting, no petals dropping on the table after a week. Making your own flowers also gives you total creative freedom over colors and shapes, and each one adds a personal touch to any space. You’ll find plenty more handmade ideas in my DIY projects section.
I’ve rounded up 15 projects that explore different techniques and materials for making artificial flowers. These DIY decor ideas work in minimalist spaces as well as in more boho or romantic styles. Each one takes a different approach, from delicate crepe paper to sturdier fabric creations, so you can switch up your decor whenever the mood strikes. If you love a natural look, you’ll also like my green decor ideas.
Contents
1. How to make crepe paper flowers with a soft, romantic finish
2. How to make fabric flowers you’ll keep for years
3. Handmade flower ideas from unexpected materials
How to make crepe paper flowers with a soft, romantic finish
Crepe paper is the go-to material when you’re starting out with DIY flowers: its stretchy texture lets you shape petals that look strikingly real with very few tools. Choose heavyweight crepe paper for cupped petals and lighter crepe for ruffles, and always cut so the fine stretch lines run from the base of the petal to the tip, with floral wire, green floral tape and tacky glue on hand.
1. Give your paper flowers lifelike stamens
Level: Easy | Time: 30 minutes | Budget: $5–10 | Materials: Crepe paper, wire, glue, scissors
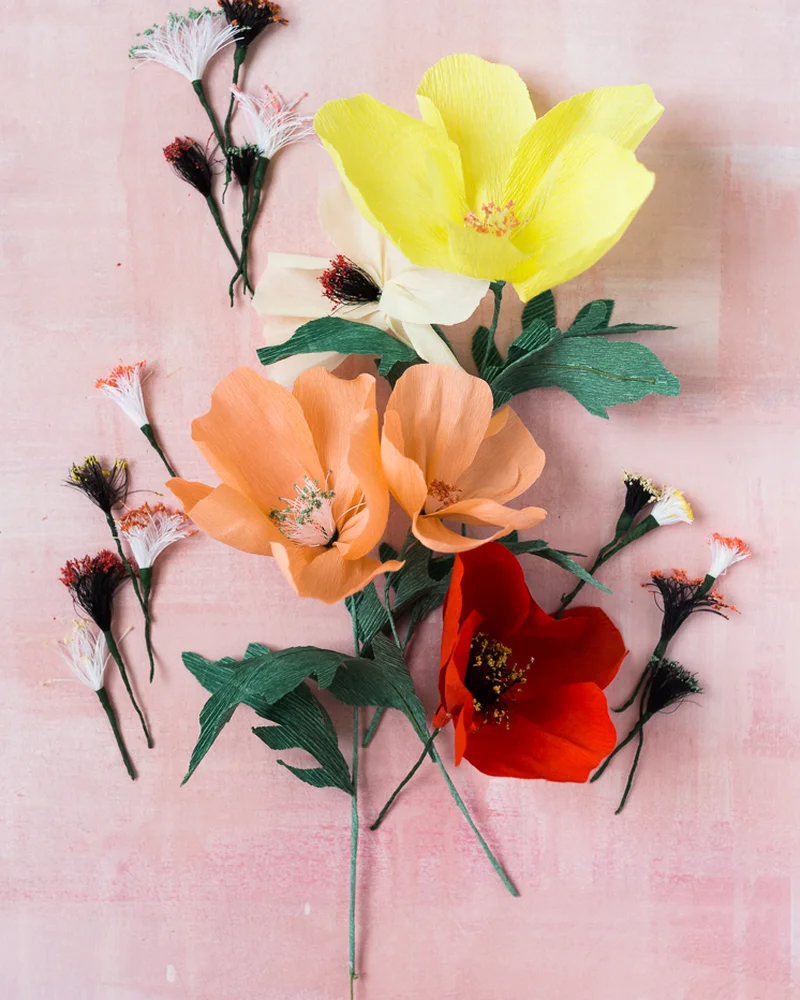
1. Yellow, peach and red crepe paper poppies, finished with dark stamens, laid out on blush pink © The House That Lars Built
This tutorial shows how to make realistic stamens that take your crepe paper flowers to the next level. You shape tiny colored balls at the tips of thin stems to mimic the real thing. You can match the colors to your flowers and your decor, and the finish looks professional even though it’s very easy to make.
Stamens are one of those small details that make the biggest difference. A flower center that looks finished draws the eye in and hides the spot where petals meet the stem. Try mustard, black or deep burgundy centers for contrast with pale petals, and cluster the stamens tightly so they read as one solid heart.
See the tutorial on The House That Lars Built
2. Gather coral and pink crepe paper flowers into a vase and wreath
Level: Easy | Time: 2–3 hours | Budget: $10–20 | Materials: Colored crepe paper, wire, glue, scissors

2. Coral and blush paper blooms in a glass vase, echoed on a hoop wreath above © Adeline Klam
This tutorial walks you through crepe paper flowers in coral and pink to arrange into pretty decorative bouquets and wreaths. You cut and crumple the paper for a natural, realistic effect. These flowers add a warm pop of color to your home, and the detailed steps make it beginner-friendly.
To get the most out of a warm palette, mix three or four related shades instead of just one: coral, peach, blush and a deeper pink look lovely together. Gather some stems loosely in a glass vase and wire the rest onto a simple hoop for a matching wreath.
See the tutorial on Adeline Klam
3. Mount crepe paper flowers on wire stems
Level: Easy | Time: 1.5 hours | Budget: $5–10 | Materials: Crepe paper, floral stems, glue, scissors

3. Pink and lilac paper flowers standing on little white bases, each with its own stem © Creavea
This project makes crepe paper flowers on stems that look incredibly real. You cut and crumple the crepe paper to give it volume before attaching it to a floral stem. I think these flowers add a lasting pop of color to any decor, and they’re easy even if you’re new to crafting.
Stemmed flowers are the most versatile to display. You can put a single bloom in a bud vase on a nightstand, line several along a mantel, or mix them with real dried grasses. Wrapping the wire carefully with floral tape, stretching it slightly as you go so it grips, gives a smooth, realistic stem.
4. Arrange a bright crepe paper bouquet in a vase
Level: Easy | Time: 2–3 hours | Budget: $5–10 | Materials: Colored crepe paper, wire, glue, scissors

4. A ribbed glass vase packed with lilac bellflowers, yellow daffodils and peach tulips in paper © Creavea
This project makes a gorgeous crepe paper bouquet that will never wilt. You carefully cut and crumple the paper to get realistic petals. It adds lasting color to any home, boho or modern. I think it’s a perfect first craft project since it needs very few supplies and anyone can do it.
When you assemble a full bouquet, vary the flower sizes and heights. Start with a few large focal blooms, fill in with medium flowers, then finish with small buds and leaves around the edges. Turning the bouquet in your hand as you add each stem keeps it balanced from every angle.
5. Shape rust and mustard petals for autumn
Level: Easy | Time: 2–3 hours | Budget: $10–20 | Materials: Colored crepe paper, wire, scissors, glue

5. Two ruffled peonies in orange and peach, simply set in a white pitcher © My Blog Déco
This project creates beautiful fall flowers in warm, vibrant crepe paper shades. You gently cut and crumple the paper for a strikingly natural effect. These arrangements bring a warm, original touch to any home and look especially good in boho or rustic decor. Even DIY beginners can do it, and the bouquets will brighten your living space all season long.
Fall paper flowers are also a smart seasonal swap: once autumn is over, simply store them flat in a box with tissue paper between layers, away from light and humidity. Crepe paper can fade in strong sun, so keep arrangements out of a south-facing window if you want the colors to stay rich year after year.
See the tutorial on My Blog Déco
How to make fabric flowers you’ll keep for years
Fabric flowers have a softness and durability other materials can’t match, and they’re a great way to use up scraps. Most need no advanced sewing, just gathering stitches, folding or glue; cotton, linen and silk are the easiest to shape, and cotton or silk edges can be lightly singed with a candle for a curled finish (test on a scrap and never leave a flame unattended).
6. Fold and stitch easy fabric flowers from scraps
Level: Easy | Time: 30–45 minutes per flower | Budget: $5–15 | Materials: Colorful fabrics, scissors, thread, needle, buttons
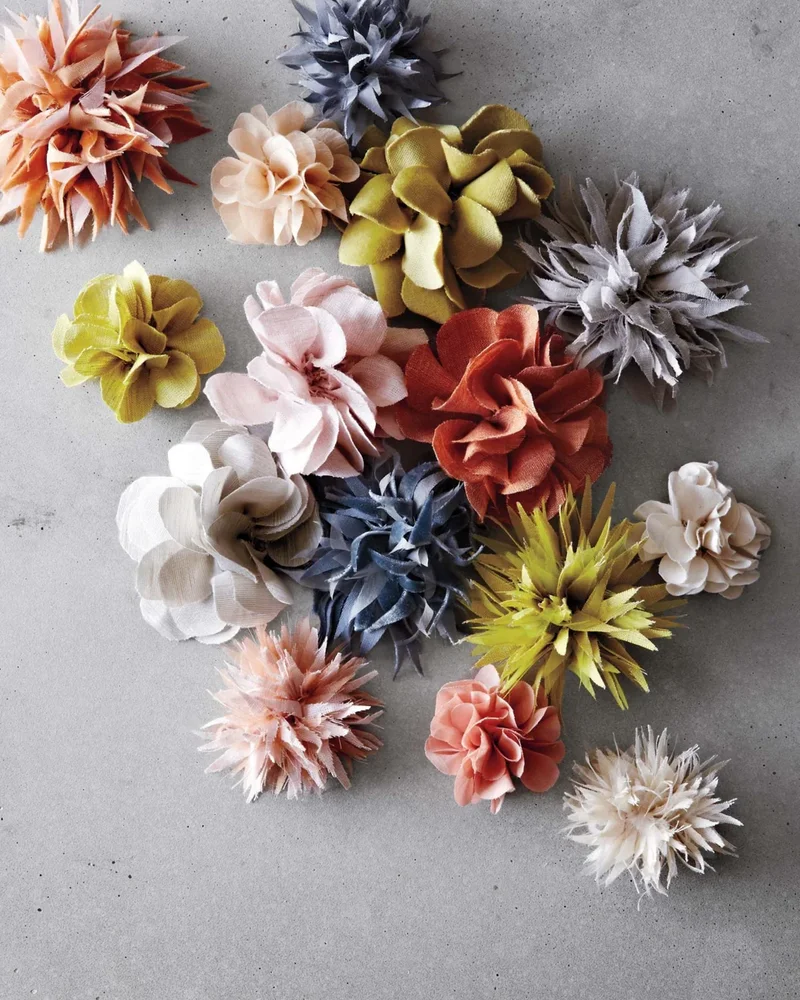
6. A scatter of ruffled and spiky fabric blooms in olive, navy, rose and dove gray © Flax and Twine
This tutorial shares a simple method for fabric flowers with delicate, realistic petals. Folding and stitching give a natural look, and mixing fabrics adds texture. These flowers bring an authentic boho touch to any room. I find the project beginner-friendly with lots of creative options, and the flowers are perfect for embellishing pillows, wreaths or lasting arrangements.
A tip for mixing fabrics: combine one solid with one or two small-scale prints in the same color family. Linen gives a relaxed, natural look, velvet looks luxurious for fall and winter, and lightweight cotton is easiest for beginners. A button or a cluster of beads in the center is a quick way to finish each flower.
See the tutorial on Flax and Twine
7. Sew a bunch of rounded fabric tulips
Level: Intermediate | Time: 2–3 hours | Budget: $15–30 | Materials: Colorful fabrics, thread, needle, polyester stuffing, artificial stems

7. Gingham and floral cotton tulips on long pink stems, with oversized green fabric leaves © Buttinette
This project turns simple scraps of fabric into elegant decorative tulips. Sewing gives the petals a realistic shape with a lovely natural drape. The bouquet brings a permanent touch of spring to your home, perfect for a romantic or farmhouse style. You’ll need some basic sewing skills, but it’s doable with a little patience.
Tulips are a great choice for fabric because their shape is simple: a few rounded petals closed around the center. Choose fabrics with a little body so the petals hold their form, and keep the stuffing light. Displayed in a tall, slim vase, a bunch of fabric tulips looks fresh on a kitchen counter or an entryway console.
See the tutorial on Buttinette
8. Build a full bouquet of fabric blooms
Level: Intermediate | Time: 2–3 hours | Budget: $15–30 | Materials: Colorful fabrics, thread, needle, scissors, floral stems
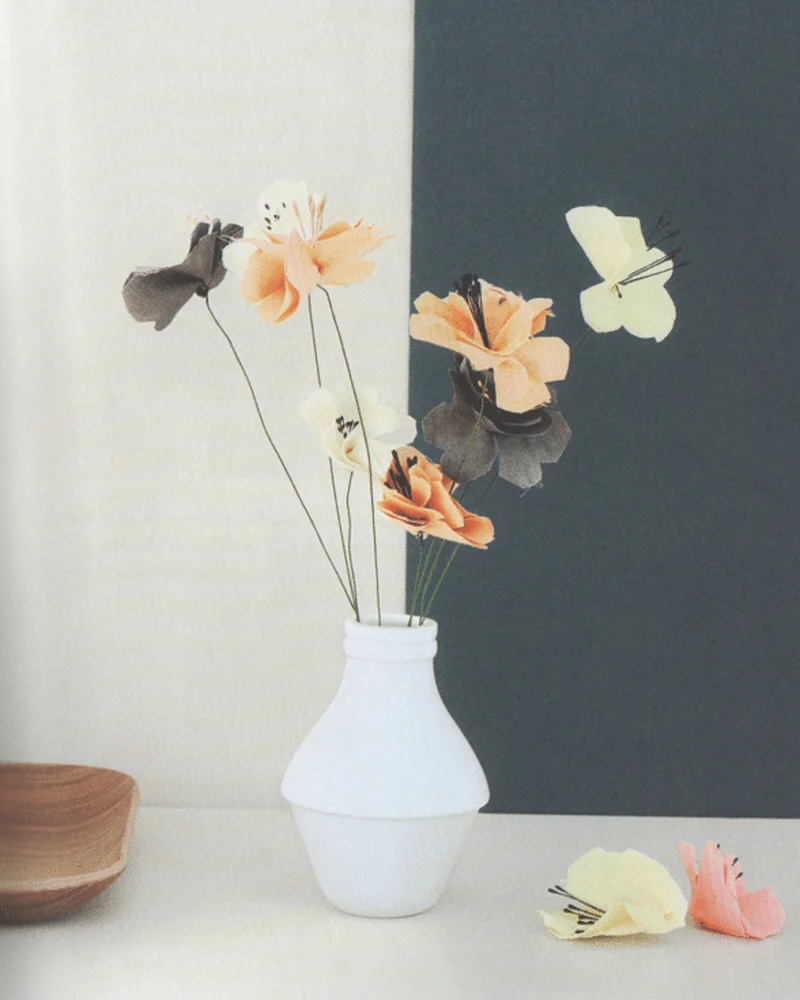
8. Airy peach, cream and charcoal fabric blossoms on fine wire stems © Zumeline
This project makes a beautiful bouquet of fabric flowers that will never fade. It combines cutting out petals with careful assembly to get realistic blooms. The result adds a soft, poetic touch to any decor, from boho to modern. I think it’s a great alternative to fresh flowers for long-lasting decor.
To make a fabric bouquet look less stiff, bend the wire stems slightly so each flower faces a different direction, just like in a real arrangement. Mixing in a few stems of faux or dried greenery also helps the whole thing feel lighter and more natural.
9. Turn vintage linens into everlasting flowers
Level: Intermediate | Time: 2–3 hours | Budget: $10–20 | Materials: Vintage fabrics, scissors, thread, needle, hot glue gun

9. Flowers cut from faded floral prints, clustered on a garden trellis and in old jugs © Marie Claire
This technique creates fabric flowers that never wilt. You cut petals from vintage fabrics and assemble them into charming arrangements. They bring a romantic, timeless touch to your home. Cutting and assembling takes some precision, but the result is truly worth it.
Vintage fabrics give these flowers their charm, so keep an eye out at thrift stores and yard sales for old tablecloths, embroidered linens, worn shirts or floral dresses. Faded colors and soft, washed textures look especially romantic. Use them as a corsage, a napkin ring, a gift topper or clustered into a wreath.
See the tutorial on Marie Claire
10. Pair fabric petals with dried grasses for fall
Level: Easy | Time: 2–3 hours | Budget: $10–20 | Materials: Fabric, dried flowers, thread, needle, scissors

10. Caramel and cream fabric petals mixed with dried stems, displayed on a rattan bench © MyMyReloo
This DIY pairs fabric with dried flowers for dreamy arrangements. You shape fabric petals and blend them with natural botanicals. The result has a soft, autumnal mood that’s perfect for boho or farmhouse decor. I love that it mixes faux and natural materials for a really authentic look.
Dried flowers are fragile, so add them last, once your fabric flowers are secured. Pampas grass, bunny tails, eucalyptus, lavender and dried wheat all pair well with neutral linen or cotton petals. Keep the arrangement away from direct heat sources, and dust it gently with a hair dryer on the cool setting.
Handmade flower ideas from unexpected materials
Thinking outside the box leads to truly unique flowers from shrink plastic, cardboard and recycled materials, a great fit for contemporary and industrial interiors. Before buying anything, check your recycling bin and craft drawer: egg cartons, leftover yarn and scrap paper can all become flowers with a little paint.
11. Paint recycled egg carton cups into blossoms
Level: Easy | Time: 30–45 minutes | Budget: Under $5 | Materials: Egg cartons, paint, brushes, scissors, pipe cleaners
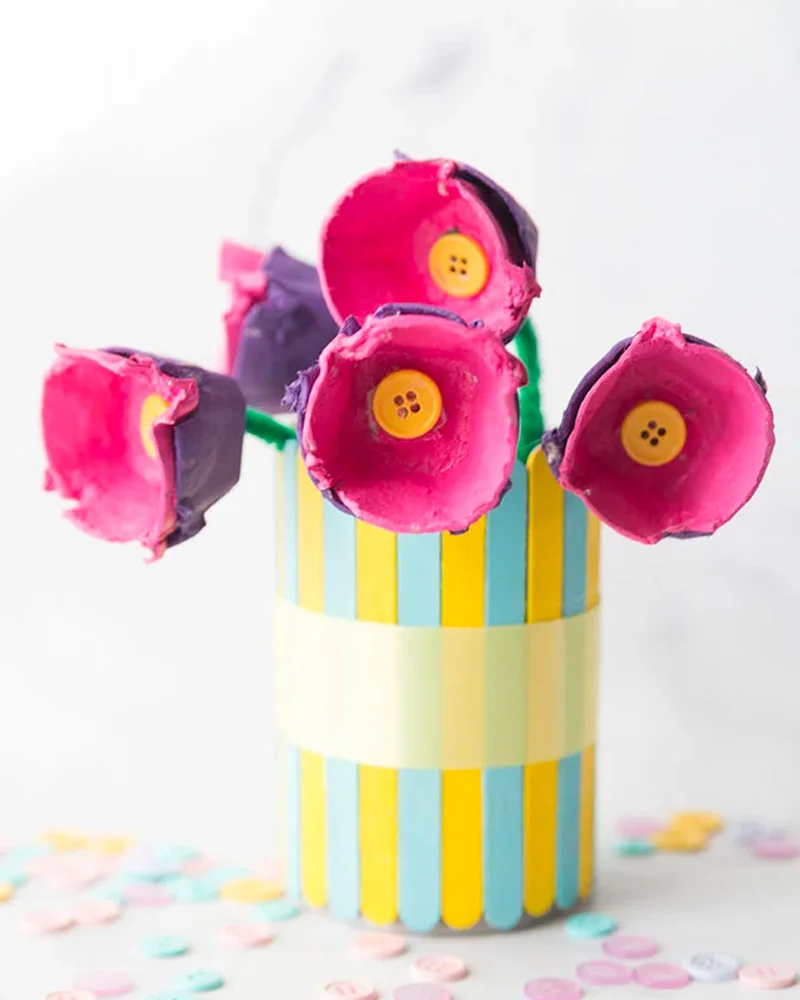
11. Hot pink egg carton cups with yellow button centers, planted in a striped popsicle-stick pot © The Best Ideas for Kids
This project turns ordinary egg cartons into pretty, colorful decorative flowers. You cut out the cups, paint them and attach them to stems. It brings a fresh, eco-friendly springtime touch to your home. I think it’s perfect for introducing kids to creative recycling while decorating the house in a fun way.
Cardboard egg cartons take paint well, but a coat of white acrylic or gesso first makes the colors brighter. For a more grown-up look, try a single palette like all white or soft pastels, and hot glue a bead or a pompom in the center. The flowers look lovely on a spring wreath or strung into a garland.
See the tutorial on The Best Ideas for Kids
12. Bake tiny apple blossoms from shrink plastic
Level: Easy | Time: 1.5 hours | Budget: $5–10 | Materials: Shrink plastic sheets, colored pencils, scissors, oven

12. A tiny white shrink plastic blossom among lime green snowball flowers in test-tube vases © Douceurs et Couleurs
This tutorial shares an original way to make delicate apple blossoms from shrink plastic. You draw and color the petals, then shrink them in the oven for a striking miniature effect. These little flowers add a poetic, springtime note to any decor. I think it’s a perfect first shrink plastic project, and the finished blossoms really capture the delicacy of the real thing.
If you’ve never used shrink plastic, a few tips help: the sheets shrink to roughly a third of their original size and get much thicker, so draw your design bigger than you want the result to be. Use colored pencils on the rough side, punch any holes before baking, and follow the package instructions for oven temperature and time.
See the tutorial on Douceurs et Couleurs
13. Roll a paper rose bouquet for a wedding
Level: Intermediate | Time: 3–4 hours | Budget: $15–30 | Materials: Colored crepe paper, wire, glue, scissors, ribbon

13. A round bridal bouquet of rolled pink paper roses with soft mint leaves © Lia Griffith
This wedding bouquet of colorful paper roses is a lasting alternative to fresh flowers. Cutting and shaping each petal takes some patience. I think the result feels personal and romantic, perfect for a boho or vintage wedding. It’s rated intermediate because getting realistic, well-proportioned roses takes careful work.
A paper bouquet is also a beautiful keepsake: unlike fresh flowers, it will look exactly the same on your first anniversary. You can make matching boutonnieres and table centerpieces in the same colors, and start well ahead of the wedding to avoid last-minute stress. Plan for a few spare roses in case some get crushed on the big day.
See the tutorial on Lia Griffith
14. Cut a graphic bouquet from kraft cardboard
Level: Easy | Time: 2–3 hours | Budget: $5–10 | Materials: Kraft cardboard, scissors, glue, wire, paint

14. Kraft-toned cardboard poppies in a black jug, with paper insects fluttering on the wall © Marie Claire
This project makes a permanent bouquet out of simple kraft cardboard. You cut the petals, then assemble them into graphic flowers. I think it adds a creative, eco-friendly touch to any modern home. It’s beginner-friendly and mostly takes patience for the cutting, a perfect alternative to fresh flowers for long-lasting decor.
For crisp, clean petals, use cardstock or thin colored cardboard rather than corrugated boxes, and score fold lines with a ruler and an empty ballpoint pen. Layering two or three shades of the same color gives depth, and a little paint or ink brushed on the edges adds a realistic shading effect.
See the tutorial on Marie Claire
15. Tie fluffy yarn pom-poms into a bouquet
Level: Easy | Time: 2–3 hours | Budget: $10–20 | Materials: Colorful yarn, scissors, wire, vase
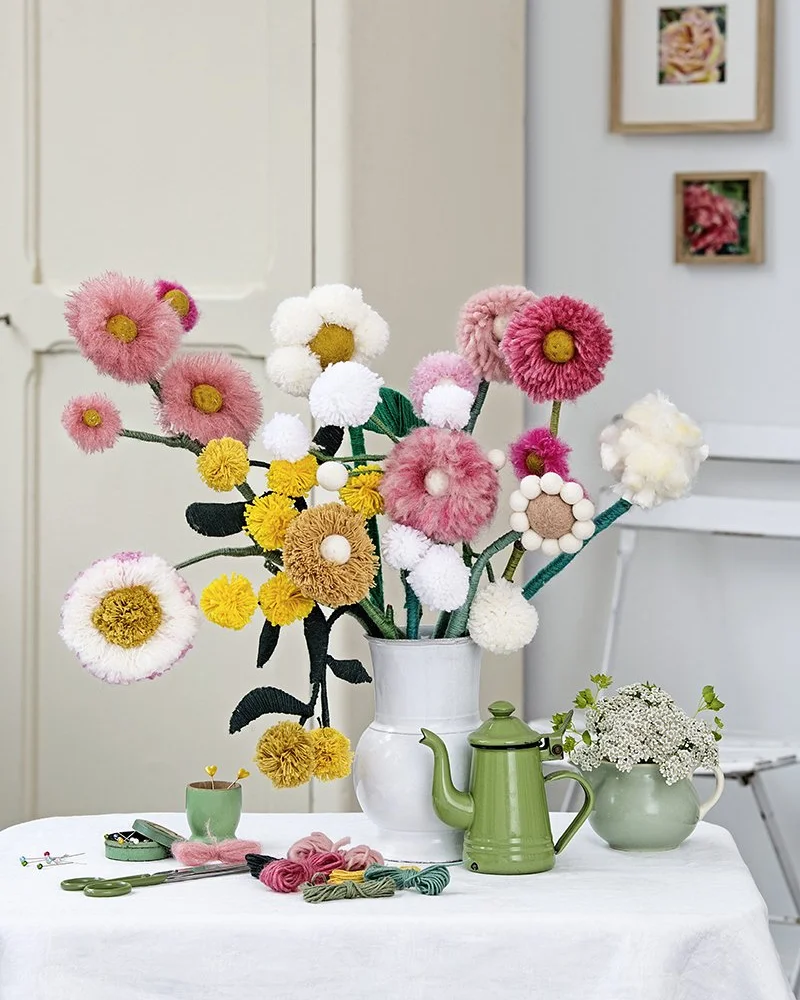
15. Pink, white and mustard yarn pom-pom flowers in a white jug next to a green enamel kettle © Marie Claire
This project turns simple yarn pom-poms into a fun, colorful bouquet. You make pom-poms in different sizes, then attach them to wire stems to form stylized flowers. It adds a soft, modern touch that’s perfect for a cozy home or a kid’s room. It’s easy for beginners and lets you play with color to suit your taste.
To make a fluffy pom-pom, wrap the yarn generously around a pom-pom maker or a piece of cardboard, tie it tightly in the middle, then cut the loops and trim it into a neat ball. The more yarn you use, the denser and rounder the flower. Mix sizes and textures, and add felt leaves for a playful bouquet that’s also safe for little hands.
See the tutorial on Marie Claire
These 15 projects give you a great range of techniques for bringing DIY flowers into your decor. Each material has its own creative and visual strengths, depending on the mood you’re after.
My advice: start with an easy project like crepe paper stamens or egg carton flowers, then move on to fabric and paper roses once you feel comfortable. Whatever you choose, these handmade blooms will brighten your home all year long, no watering required.
Frequently asked questions
What supplies do I need to make DIY flowers?
To get started you just need good scissors, glue suited to your material and floral wire for stems. Wire cutters or pliers help when shaping stems. Some projects also call for a hot glue gun or punches, depending on the technique.
How do you make crepe paper flowers look real?
Shape the petals one by one, gently stretching the paper to create natural curves. Layer the petals in slightly different sizes for volume, and mix several shades of crepe paper for realistic color variation. Lightly crumpling the edges also adds natural texture.
Can you wash fabric flowers?
It depends on the fabric and on how the flower is assembled, since glue and wire don’t like water. Flowers that are only sewn can usually be gently hand-washed. For the rest, dust them regularly with a soft brush or a hair dryer on the cool setting, and keep them dry if they contain wire.
How do you attach handmade flowers to a wreath or wall?
It depends on the weight and how you’ll use them. Lightweight flowers stick to most surfaces with strong glue or hot glue. Heavier pieces need hidden mechanical fasteners like floral wire, staples or small screws, while removable adhesive hooks work well for temporary displays.
How long does it take to make a paper flower?
A simple crepe paper flower takes about 15–30 minutes, while an elaborate fabric flower can take several hours. Projects with paint or alternative materials usually take longer because of drying time, so factor in prep time for your materials too.